Hamidreza Talebi, linux

You can configure network interface by editing configuration files stored in /etc/sysconfig/network-scripts/ directory.

Lets configure the first network interface eth0. Edit the interface configuration file.

# vi /etc/sysconfig/network-scripts/ifcfg-eth0
(if file doesn't exist, create it with name of ifcfg-ethx)

Append/Modify as follows:

For a system using a Static IP Address

DEVICE="eth0" 
BOOTPROTO="none" 
ONBOOT="yes" 
IPADDR="192.168.1.15" 
NETMASK="255.255.255.0" 
GATEWAY="192.168.1.1"

For a system using a DHCP

DEVICE="eth0"
BOOTPROTO="dhcp"
ONBOOT="yes"

Parameter

Description

DEVICE=<name> Name of the physical device
BOOTPROTO=<none|bootp|dhcp> Protocol to use.
none – No boot-time protocol should be used
bootp – The BOOTP protocol should be used
dhcp – The DHCP protocol should be used
ONBOOT=<yes|no> Should the device be activated at boot-time
IPADDR=<address> IP address
GATEWAY=<address> Gateway IP address
NETMASK=<mask> Netmask value
systemctl restart network

then you have to disable and enable interface:
ifdown eth0; ifup eth0


Hamidreza Talebi, linux

I have seen some people want to make shared folder between VirtualBox and ubuntu but it is sometimes tricky for them to make a shared folder:

1- First install “Insert guest Additional CD” from Devices. In ubuntu VM, you may install those sh files first.

2- restart the system

3- Make a Shared Folder from Settings> Shared Folder

4- Add your ubuntu user to vboxsf group

sudo adduser $USER vboxsf

Hamidreza Talebi, linux

Introduction

When running a website, there are often parts of the site that you’ll want to restrict from visitors. Web applications may provide their own authentication and authorization methods, but the web server itself can also be used to restrict access if these are inadequate or unavailable.

In this guide, we’ll demonstrate how to password-protect assets on an Apache web server running on Ubuntu 16.04.

Prerequisites

In order to complete this tutorial, you will need access to an Ubuntu 16.04 server.

In addition, you will need the following before you can begin:

  • A sudo user on your server: You can create a user with sudo privileges by following the Ubuntu 16.04 initial server setup guide.
  • An Apache2 web server: If you haven’t already set one up, the Apache section of the in-depth article, How To Install Linux, Apache, MySQL, PHP (LAMP) stack on Ubuntu 16.04
    , can guide you.
  • A site secured with SSL: How you set that up depends on whether you have a domain name for your site.
    • If you have a domain name… the easiest way to secure your site is with Let’s Encrypt, which provides free, trusted certificates. Follow the Let’s Encrypt guide for Apache to set this up.
    • If you do not have a domain… and you are just using this configuration for testing or personal use, you can use a self-signed certificate instead. This provides the same type of encryption, but without the domain validation. Follow the self-signed SSL guide for Apache to get set up.

When all of these are in place, log into your server as the sudo user and continue below.

Step 1 — Installing the Apache Utilities Package

We will use a utility called htpasswd, part of the apache2-utils package, to create the file and manage the username and passwords needed to access restricted content.

  • sudo apt-get update
  • sudo apt-get install apache2-utils

Step 2 — Creating the Password File

We now have access to the htpasswd command. We can use this to create a password file that Apache can use to authenticate users. We will create a hidden file for this purpose called .htpasswd within our /etc/apache2 configuration directory.

The first time we use this utility, we need to add the -c option to create the specified file. We specify a username (sammy in this example) at the end of the command to create a new entry within the file:

  • sudo htpasswd -c /etc/apache2/.htpasswd sammy

You will be asked to supply and confirm a password for the user.

Leave out the -c argument for any additional users you wish to add:

  • sudo htpasswd /etc/apache2/.htpasswd another_user

If we view the contents of the file, we can see the username and the encrypted password for each record:

  • cat /etc/apache2/.htpasswd
Output
sammy:$apr1$.0CAabqX$rb8lueIORA/p8UzGPYtGs/
another_user:$apr1$fqH7UG8a$SrUxurp/Atfq6j7GL/VEC1

Step 3 — Configuring Apache Password Authentication

Now that we have a file with users and passwords in a format that Apache can read, we need to configure Apache to check this file before serving our protected content. We can do this in one of two ways: either directly in a site’s virtual host file or by placing .htaccess files in the directories that need restriction. It’s generally best to use the virtual host file, but if you need to allow non-root users to manage their own access restrictions, check the restrictions into version control alongside the website, or have a web applications using .htaccess files for other purposes already, check out the second option.

Choose the option that best suits your needs.

Option 1: Configuring Access Control within the Virtual Host Definition (Preferred)

The first option is to edit the Apache configuration and add the password protection to the virtual host file. This will generally give better performance because it avoids the expense of reading distributed configuration files. This option requires access to the configuration, which isn’t always available, but when you do have access, it’s recommended.

Begin by opening up the virtual host file that you wish to add a restriction to. For our example, we’ll be using the 000-default.conf file that holds the default virtual host installed through Ubuntu’s apache package:

  • sudo nano /etc/apache2/sites-enabled/000-default.conf

Inside, with the comments stripped, the file should look similar to this:

/etc/apache2/sites-enabled/000-default.conf
<VirtualHost *:80>
  ServerAdmin webmaster@localhost
  DocumentRoot /var/www/html
  ErrorLog ${APACHE_LOG_DIR}/error.log
  CustomLog ${APACHE_LOG_DIR}/access.log combined
</VirtualHost>

Authentication is done on a per-directory basis. To set up authentication, you will need to target the directory you wish to restrict with a <Directory ___> block. In our example, we’ll restrict the entire document root, but you can modify this listing to only target a specific directory within the web space:

/etc/apache2/sites-enabled/000-default.conf
<VirtualHost *:80>
  ServerAdmin webmaster@localhost
  DocumentRoot /var/www/html
  ErrorLog ${APACHE_LOG_DIR}/error.log
  CustomLog ${APACHE_LOG_DIR}/access.log combined

  <Directory "/var/www/html">
  </Directory>
</VirtualHost>

Within this directory block, specify that we wish to set up Basic authentication. For the AuthName, choose a realm name that will be displayed to the user when prompting for credentials. Use the AuthUserFile directive to point Apache to the password file we created. Finally, we will require a valid-user to access this resource, which means anyone who can verify their identity with a password will be allowed in:

/etc/apache2/sites-enabled/000-default.conf
<VirtualHost *:80>
  ServerAdmin webmaster@localhost
  DocumentRoot /var/www/html
  ErrorLog ${APACHE_LOG_DIR}/error.log
  CustomLog ${APACHE_LOG_DIR}/access.log combined

  <Directory "/var/www/html">
      AuthType Basic
      AuthName "Restricted Content"
      AuthUserFile /etc/apache2/.htpasswd
      Require valid-user
  </Directory>
</VirtualHost>

Save and close the file when you are finished.

Before restarting the web server, you can check the configuration with the following command:

  • sudo apache2ctl configtest

If everything checks out and you get Syntax OK, then restart the server to implement your password policy. Since systemctl doesn’t display the outcome of all service management commands, we’ll use the the status to be sure the server is running:

  • sudo systemctl restart apache2
  • sudo systemctl status apache2

Now, the directory you specified should now be password protected.

Option 2: Configuring Access Control with .htaccess Files

Apache can use .htaccess files in order to allow certain configuration items to be set within a content directory. Since Apache has to re-read these files on every request that involves the directory, which can negatively impact performance, Option 1 is preferred, but if you are already using .htaccess file or need to allow non-root users to manage restrictions, .htaccess files make sense.

To enable password protection using .htaccess files, open the main Apache configuration file:

  • sudo nano /etc/apache2/apache2.conf

Find the <Directory> block for the /var/www directory that holds the document root. Turn on .htaccess processing by changing the AllowOverride directive within that block from “None” to “All”:

/etc/apache2/apache2.conf
. . .

<Directory /var/www/>
  Options Indexes FollowSymLinks
  AllowOverride All
  Require all granted
</Directory>

. . .

Save and close the file when you are finished.

Next, we need to add an .htaccess file to the directory we wish to restrict. In our demonstration, we’ll restrict the entire document root (the entire website) which is based at /var/www/html, but you can place this file in any directory where you wish to restrict access:

  • sudo nano /var/www/html/.htaccess

Within this file, specify that we wish to set up Basic authentication. For the AuthName, choose a realm name that will be displayed to the user when prompting for credentials. Use the AuthUserFile directive to point Apache to the password file we created. Finally, we will require a valid-user to access this resource, which means anyone who can verify their identity with a password will be allowed in:

/var/www/html/.htaccess
AuthType Basic
AuthName "Restricted Content"
AuthUserFile /etc/apache2/.htpasswd
Require valid-user

Save and close the file. Restart the web server to password protect all content in or below the directory with the .htaccess file and use systemctl status to verify the success of the restart:

  • sudo systemctl restart apache2
  • sudo systemctl status apache2

Step 4 — Confirming Password Authentication

To confirm that your content is protected, try to access your restricted content in a web browser. You should be presented with a username and password prompt that looks like this:
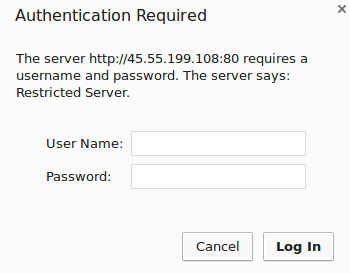
Apache2 password prompt

If you enter the correct credentials, you will be allowed to access the content. If you enter the wrong credentials or hit “Cancel”, you will see the “Unauthorized” error page:

Apache2 unauthorized error

Conclusion

Congratulations! If you’ve followed along, you’ve now set up basic authentication for your site. Apache configuration and .htaccess can do much more than basic authentication, however. To find out more about the flexibility and power available in Apache configuration, try one of these tutorials:


source: digitalocean.com

Hamidreza Talebi, linux

Today we will be looking into how to setup a centralized log management for Linux servers, this will help the Linux admin to have a multiple server logs into one single place. The Linux admin not required to login in to each servers for checking the logs, he can just login into the centralized server and start do the logs monitoring.

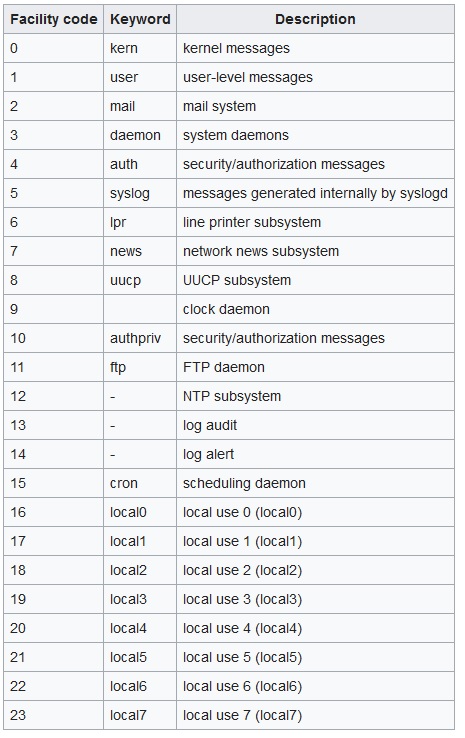
Linux labels (auth, cron, ftp, lpr, authpriv, news, mail, syslog, etc ,..) the log messages to indicate the type of software that generated the messages with severity (Alert, critical, Warning, Notice, info, etc ,..).

You can find more information on Message Labels and Severity Levels

Make sure you have the following to setup log server.

Two Linux servers ( server and client).

server.itzgeek.com 192.168.12.131

client.itzgeek.com 192.168.12.132

Server setup:

Install syslog package, if you do not have it installed.

[root@server ~]# yum -y install rsyslog

Edit /etc/rsyslog.conf

[root@server ~]# vi /etc/rsyslog.conf

Un comment the following to enable the syslog server to listen on the tcp and udp port.
From

# Provides UDP syslog reception
#$ModLoad imudp
#$UDPServerRun 514
 
# Provides TCP syslog reception
#$ModLoad imtcp
#$InputTCPServerRun 514

To

# Provides UDP syslog reception
$ModLoad imudp
$UDPServerRun 514
 
# Provides TCP syslog reception
$ModLoad imtcp
$InputTCPServerRun 514

Restart the syslog service

[root@server ~]# systemctl restart rsyslog.service

Verify the syslog server listening.

[root@server ~]# netstat -antup | grep 514
tcp        0      0 0.0.0.0:514             0.0.0.0:*               LISTEN      759/rsyslogd        
tcp6       0      0 :::514                  :::*                    LISTEN      759/rsyslogd        
udp        0      0 0.0.0.0:514             0.0.0.0:*                           759/rsyslogd        
udp6       0      0 :::514                  :::*                                759/rsyslogd

Client setup:

Install syslog package, if you do not have it installed. Edit /etc/rsyslog.conf

[root@client ~]# vi /etc/rsyslog.conf

At the end of file place the following line to point the client message log to the server

*.info;mail.none;authpriv.none;cron.none   @192.168.12.131

You can either mention @hostname or @ip address.

Restart the syslog service

[root@client ~]# systemctl restart rsyslog.service

Now all the message logs are sent to the central server and also it keeps the copy locally.

Firewall Port opening (Optional):

Mostly all the production environment are protected by hardware firewall, ask them to open the TCP & UDP 514.
If you have IP tables enabled, run the following command on server in order to accept incoming traffic on UDP / TCP port 514.

[root@server ~]#firewall-cmd --permanent --zone=public --add-port=514/tcp
[root@server ~]#firewall-cmd --permanent --zone=public --add-port=514/udp
[root@server ~]#firewall-cmd --reload

You can verify the port opening by issuing the following command from the client.

[root@client ~]# telnet 192.168.12.131 514
 
Trying 192.168.12.131...
Connected to 192.168.12.131.
Escape character is '^]'.

If it didn’t give any reply, disable firewall on both client and server.

Test:

Monitor the activity from the log server, open the message log.

[root@server ~]# tailf /var/log/messages

I have installed and started vsftpd on client machine, you can see both are recorded in syslog server.

Oct  5 06:03:53 client yum[2425]: Installed: vsftpd-3.0.2-9.el7.x86_64
Oct  5 06:04:13 client systemd: Starting Vsftpd ftp daemon...
Oct  5 06:04:13 client systemd: Started Vsftpd ftp daemon.

By this way you can monitor the other logs such as secure, mail, cron logs etc.

also we have these main categories for syslog’s facility:

Hamidreza Taleb


source: http://www.itzgeek.com/how-tos/linux/centos-how-tos/setup-syslog-server-on-centos-7-rhel-7.html

Hamidreza Talebi, linux

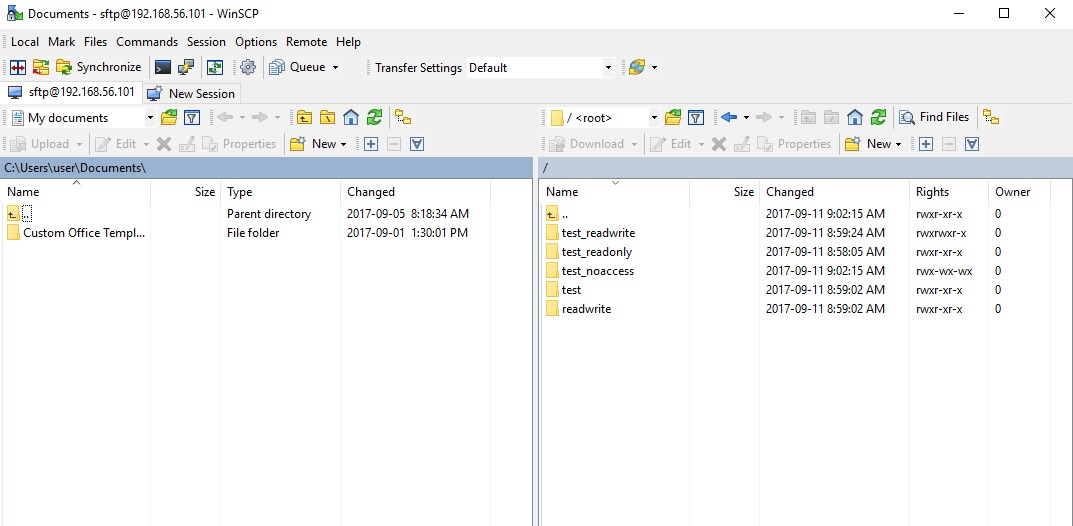
sudo apt-get install openssh-server

————– Define a group —————————
sudo group add sftponly
cat /etc/group

———— Add User to Group————————-
useradd hamid -d / -g [group number] -M -N -o -u [group number]
sudo passwd hamid

———–Backup sshd_config file———————-

sudo cp /etc/ssh/sshd_config /etc/ssh/sshd_config.bak
sudo nano +76 /etc/ssh/sshd_config

——————–Edit in sshd_config file—————

Subsystem sftp internal-sftp

Match User sammyfiles
ForceCommand internal-sftp
PasswordAuthentication yes
ChrootDirectory /var/www
PermitTunnel no
AllowAgentForwarding no
AllowTcpForwarding no
X11Forwarding no

——————————————————————-
sudo systemctl restart sshd

root@hrt-VirtualBox:~# mkdir /var/www
root@hrt-VirtualBox:~# cd /var/www
root@hrt-VirtualBox:/var/www# mkdir test_readonly
root@hrt-VirtualBox:/var/www# chmod 755 test_readonly
root@hrt-VirtualBox:/var/www# mkdir test readwrite
root@hrt-VirtualBox:/var/www# mkdir test_readwrite
root@hrt-VirtualBox:/var/www# chown root:sftponly test_readwrite
root@hrt-VirtualBox:/var/www# chmod 775 test_readwrite
root@hrt-VirtualBox:/var/www# mkdir test_noaccess
root@hrt-VirtualBox:/var/www# chmod 733 test_noaccess


you can use SCP or Putty to connect to server in windows

Hamidreza Talebi

Hamidreza Talebi, linux

You can set schedule in linux with this command:

$ crontab -e

for example:

We want our job to run at 5 A.M., which would be minute 0, hour 5, every day of the month, every month, every day of the week. We need to add a line to the bottom of the file which looks like this:

0 5 * * * /home/myname/scripts/do-every-day.sh

for backup everyday at 12:02 AM

2 0 * * * tar -zcf  /home/hrt/Desktop/backup/$(date +\%H-\%M-\%S-\%d-\%m-\%Y).tar.gz  /usr/local/bro/logs>/dev/null 2>&1

for fixing bug in ubuntu you have to add >/dev/null 2>&1 to every crontab you define.

For checking your crontab, use this command:

$crontab -l

For removing crontab just add this one:

$crontab -r

For viewing logs run  this command:

sudo grep -i cron /var/log/syslog

Hamidreza Talebi, linux

tty= teletypewriter

Ctrl+Alt + F1 =tty1
Ctrl+Alt + F2 =tty2
.
.

Ctrl+Alt+F7= graphic

Description of Command
$apropos file

See manual
$ man file

where we are?
$ which ls

what is in root
$ ls /

show files in list
$ls -l

show the content of directory
$ls -lR

. current directory
.. parent directory
~ user’s home folder

Editors
nano , vim ,vi
$ nano FileName
$ vi FileName
exit : escape :q

To create file
$ touch filename

To see inside file
$ cat filename

To copy
$ cp sourceDirectory Destination
$ cp myfile2 myfile3 Documents // copy to two destinations

To remove file
$ rm myfile

Give list of the files starts with a
$ ls a*


give list of the files starts with three character
$ls ???

link files together
ln users.txt Document/list.txt

find a file larger than 10M
$ find +size +10M

write some text in file
$echo “more information” > output.txt
$ ls > homedir.txt

Use Pipe
$ cat homedir.txt | wc
// count file text

compare files
$diff -y text1.txt text2.txt

$ diff -u text1.txt text2.txt

compare binaries files
$ cmp text1.txt text2.txt

Archives and Compression
$tar -cf doc.tar listoffiles
$tar -tf doc.tar //read
$tar -xf doc.tar extractdistination


Zip file1 file2 …
unzip myfiles.zip -d unzip //create foldername unzip to extract


Find with grep
$ cat users.txt | grep -E “[A-M][m-z]”

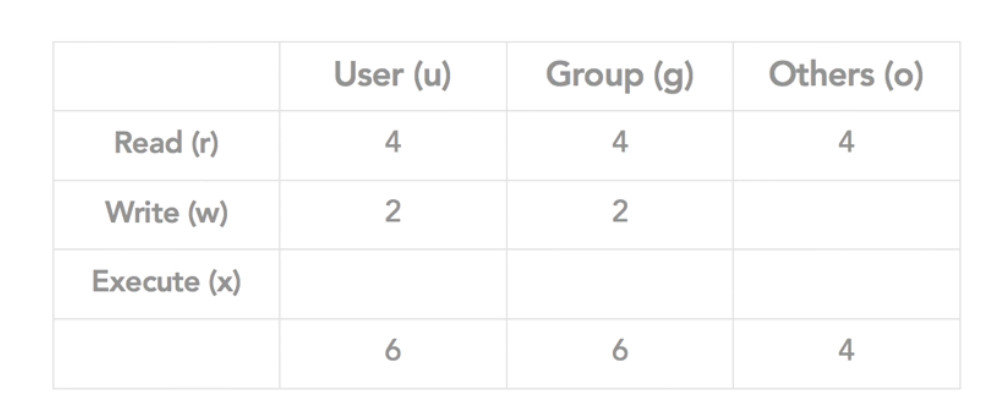
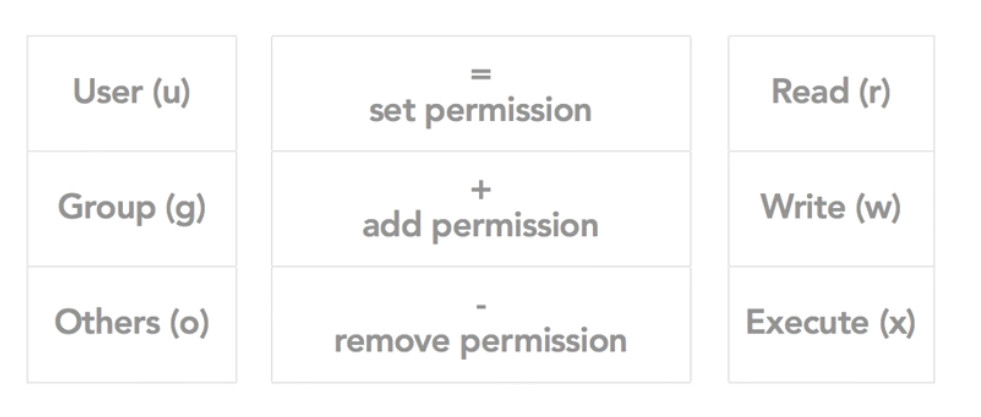
change permission
$ chmod 600 myfile
$ chmod ugo+rwx myfile

Hamidreza Talebi- Linux

change currnet user to root user
$sudo -s
#

SSH
$sudo apt install openssh-server

to connect from another system: ssh user@ip

SFTP
$ get file3
$ put file3

SCP
Secure Copy Protocol
remote component user@host:path-to-file
$scp file4 hrt@192.168.3.10:/Documents

Packages update
sudo apt-get update
sudo apt-get upgrade

Enable Firewall
ufw enable
ufw allow 22/tcp

Disable Firewall
ufw disable

dd if=source of=destination // copy large – cloning
ps //show process
ps aux | grep “evol”
ifconfig
apt-get install ….

ip address add 192.168.99.37/24 dev eth0