Posts

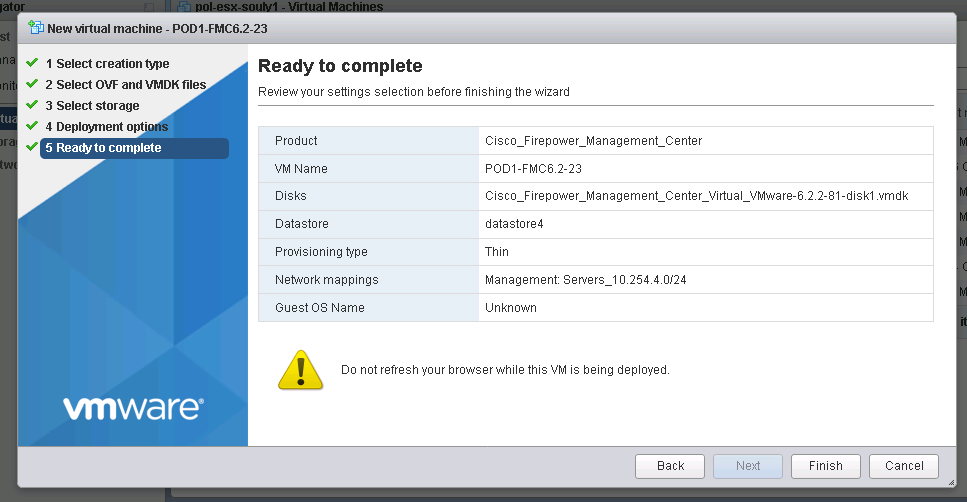
First of all, we have to create an SSID profile. You can do this with the command dot11 ssid ssid. Let’s make a SSID with the name ‘CiscoTalkWireless’.

1
2
ap(config)#dot11 ssid CiscoTalkWireless
ap(config-ssid)#

Next, we can configure the SSID properties. In this example, we want to use open authentication with key management provided by WPA2. In addition, I want to broadcast this SSID. This makes its easier for users to connect to your network. This is especially useful for guest wireless networks. While in SSID configuration mode:

1
2
3
4
ap(config-ssid)#authentication open
ap(config-ssid)#authentication key-management wpa version 2
ap(config-ssid)#guest-mode
ap(config-ssid)#wpa-psk ascii CiscoTalkTutorials!

The configuration is pretty self-explanatory.
authentication open enables open authentication.

authentication key-management wpa version 2 configures this SSID to use WPA2. If you leave off version 2and enter authentication key-management wpa, you are configuring the SSID with WPA.

guest-mode enables SSID broadcasting.

wpa-psk ascii sets the pre-shared key for the SSID.

Now with the SSID profile configured, we need to specify an encryption method. Let’s enter interface configuration mode on Dot11Radio0:

1
2
ap(config)#interface Dot11Radio0
ap(config-if)#

There are a few options you can use for encryption. You can also use AES, TKIP, and WEP. I strongly advise against using WEP and recommend AES over TKIP.
For AES:

1
ap(config-if)# encryption mode ciphers aes-ccm

For TKIP:

1
ap(config-if)# encryption mode ciphers tkip

Now with the encryption method in place, let’s assign the SSID:

1
ap(config-if)# ssid CiscoTalkWireless

By default and as a security measure, all new Cisco Access Points ship with the radios turned off. So as a final step, let’s enable the radio:

1
ap(config-if)# no shutdown

By default, Cisco access points select the least congested wireless channel. As soon as you enable the interface, the access point will scan and assign itself an appropriate channel. Once the channel selection process is complete, you should now have a working wireless network! You can verify connected clients by using the show dot11 associations command:

1
2
3
4
5
6
7
8
9
ap#show dot11 associations
802.11 Client Stations on Dot11Radio0:
SSID [CiscoTalkWireless] :
MAC Address    IP address      Device        Name            Parent         State
100b.bbbd.e248 10.10.83.110    ccx-client    CiscoTalk-PC    self           Assoc
ap#

My next post will be a tutorial on how to configure multiple SSIDs using different VLANs on a single access point.

Technology: Network Security
Area: Next Generation Firewalls
Vendor: Cisco
Software: 8.X, 9.X, FMC 5.X, 6.X, SFR module 5.X , 6.X
Platform: Cisco ASA, Firepower Management Center VM

Firepower Management Center installation steps

1. Deployment from OVF

FMC installation step 1


2. Assign the hostname for VM

fmc installation step 2

3. Choose the right ovf and vmdk files

FMC installation step 3


4. Select proper vNIC (the one you will use for management purposes and communication with the sensor) and disk provisioning type

FMC installation step 5


5. VM Deployment is finished

FMC installation step 6


6. VM starts the installation

FMC installation step 7


Note: The Cisco Firepower Management Center Virtual instance then appears under the specified data center in the Inventory. Booting up the new VM could take up to 30-40 minutes.


7. After about 20 minutes you will see the system first initialization message

FMC installation step 8


8. After installation is complete, the firepower login prompt appears.

Note: A message “WRITE SAME failed. Manually zeroing.” may appear after the system is booted up for the first time. This does not indicate a defect, it correctly indicates that the VMware storage driver does not support the WRITE SAME command.  The system displays this message, and proceeds with a fallback command to perform the same operation

FMC installation step 9


Default user and password for version 6.x FMC and later

  • Username: admin
  • Password: Admin123


9. First login and setup

FMC installation step 10


10. Setup of FMC – CLI (you might be prompted for sudo password then provide the same password as used when loging in)

FMC installation step 11


11. Checking the interfaces on FMC and ensuring proper addressing:

FMC installation step 12


12. First GUI login comes up after typing the IP address (or FMC’s FQDN) set during installation. To login use exactly the same credentials as used for CLI login.

FMC installation step 13


R1
int tunnel 0
tunnel source gi1/0
tunnel destination mode gre multipoint
tunnel key HRT //should be the same
ip nhrp network-id 1 //should be the same
ip nhrp authentication cisco123 //should be the same
ip nhrp map multicast dynamic
ip nhrp shortcut //phase 3
ip nhrp redirect //phase 3 – we write it in the server
ip address 172.16.0.1 255.255.255.0
tunnel path-mtu-discovery
ip tcp adjust-mss 1360

R2
int tunnel 0
tunnel mode gre multipoint
tunnel source gi 1/0
tunnel key HRT
ip nhrp network-id 1
ip nhrp authentication cisco123
ip nhrp shortcut
ip nhrp nhs 172.16.0.1
ip nhrp map 172.16.0.1 15.0.0.1 //Gre interface then IP interface
ip nhrp map multicast 15.0.0.1
ip address 172.16.0.2 255.255.255.0
ip tcp adjust-mss 1360

R3
int tunnel 0
tunnel mode gre multipoint
tunnel source gi 1/0
tunnel key HRT
ip nhrp network-id 1
ip nhrp authentication cisco123
ip nhrp shortcut
ip nhrp nhs 172.16.0.1
ip nhrp map 172.16.0.1 15.0.0.1 //Gre interface then IP interface
ip nhrp map multicast 15.0.0.1
ip address 172.16.0.3 255.255.255.0
ip tcp adjust-mss 1360


Configuring  IPSEC on Each router

R1
————————-
(config)# crypto isakmp policy 5
(config-isakmp)# hash sha
(config-isakmp)# authentication pre-share
(config-isakmp)# group 14
(config-isakmp)# lifetime 86400
(config-isakmp)# encryption aes 256

(config)#crypto isakmp key cisco123 address …..(your device)
(config)#crypto ipsec transform-set OUTSET esp-aes 256 esp-sha-hmac
(cfg-crypto-trans)# mode transport

(config)#crypto ipsec profile OUR_IPSEC_PROFILE
(ipsec-profile)# set transform-set OURSET

(config)#int tunnel 0
(config-if)# tunnel protection ipsec profile OUR_IPSEC_PROFILE

show dmvpn
show crypto isakmp sa detail
show dmvpn peer nbma …..(IP Peer) detail

Troubleshooting

show run int tunnel 0
debug crypto isakmp // debug phase 1
show crypto isakmp policy
show crypto isakmp key
show crypto engine connections active
show dmvpn detail

A virtual LAN (Local Area Network) is a logical subnetwork that can group together a collection of devices from different physical LAN.

1-1 Create VLAN

Imagine that we have different departments on your company and you want to separate each department based on their employees. So, with the VLAN concept you can create a VLAN and then assign different ports to these VLANs.

Vlan 10-20-30 in Switch1
Enter a caption for this image (optional)

In the above picture, we have 3 departments, each of which is assigned to unique VLAN. let’s configure switch:

sw# conf t
sw(config)# vlan 10
sw(config-vlan)# name Management
sw(config-vlan)# exit
sw(config)# vlan 20
sw(config-vlan)# name IT
sw(config-vlan)# exit
sw(config)# vlan 30
sw(config-vlan)# name SALES
sw(config-vlan)# exit

For viewing created VLANs, we enter this command:

sw# show vlan

Enter a caption for this image (optional)

VLAN 1 is a default VLAN in Cisco devices. VLAN from 1002-1005 are for other protocols. VLAN from 1006- 4094 is called Extended VLAN.

1-2 Access Switch Ports to Vlan

In above picture, a PC in VLAN 10 is connected to port Fa0/1 switch. So, we can write this command to access port Fa0/1 to VLAN 10:

sw(config)# int fa0/1
sw(config-vlan)# switchport mode access
sw(config-vlan)# switchport access vlan 10
sw(config-vlan)# exit

Now, if we enter show vlan:

Enter a caption for this image (optional)

Now we do it for other ports:

sw(config)# int fa0/2
sw(config-vlan)# switchport mode access
sw(config-vlan)# switchport access vlan 20
sw(config-vlan)# exit
sw(config)# int fa0/3
sw(config-vlan)# switchport mode access
sw(config-vlan)# switchport access vlan 30
sw(config-vlan)# exit

and the result is:

Enter a caption for this image (optional)
1-3 Native Vlan

By default in Cisco switches , Vlan 1 is a native Vlan. It means, untagged traffic carries in this vlan. We’ll know how to change Native Vlan.

The first question is asked by those who are using Cisco devices for the first time is that how can I connect to Cisco devices. It needs kind of cable which is called rollover cable.

Rollover cable
Enter a caption for this image (optional)

rollover cable contains RJ-45 and RS-232 and as it is demonstrated in below picture, RJ-45 is connected to switch and on the other hand RS-232 is connected to PC.

Console to PC
Enter a caption for this image (optional)

Today’s PCs usually don’t have RS-232 port. You have to buy kind of convertor for RS-232 to USB or you can use new rollover cable which is RJ45 to USB.

you can use kind of these software in PC to connect to switch through the console port. Putty is a famous software which supports SSH, Telnet, Serial.

I’ve uploaded a video in Youtube to become familiar how to connect rollover cable to switch and how to connect switch through Putty

Enter a caption (optional)