1- Verify basic functionality and DNS

2- Join ISE to AD

3- Make an Identity Source Sequences

go to Administration > External Identity Sources and add active directory. Click on Add and then enter information of AD, you probably get the prompt for Username and Password. So, Enter your AD administrator in the prompt.

Then, if everything goes well, your ISE successfully join the Active Directory.

You can prove your connection by going to Active Directory again and check  the Computers section. As it is shown in the picture, ISE computer should be shown.

Now, we can tell the ISE to authenticate first from AD then if you can’t find the user go to local database. So, you have to make a Identity Source Sequence to change the order.

In the Name box select the optional Name then in the selected section first select AD then Internal Users. Finally select “Treat as if the user was not found and proceed to the next store in the sequence” option and save.

Now, go to Policy > Authentication Policy > Use  select your previous Identity “first_AD_then_local”.

To test, you can make new a user in AD

As you can see, user logs shows successful login.


First, configure the interface which is connected to the endpoint, previously we configured the interface as below:

SW(config)#int gi1/0/2

SW(config-if)#switchport mode access
SW(config-if)#authentication host-mode multi-auth
SW(config-if)#authentication open
SW(config-if)#dot1x pae authenticator
SW(config-if)#dot1x timeout tx-period 10
SW(config-if)#authentication port-control auto
SW(config-if)#authentication periodic
SW(config-if)#authentication timer reauthenticate server

Now, add this configuration for the interface:

SW(config-if)#mab
SW(config-if)#authentication order mab dot1x
SW(config-if)#authentication priority dot1x mab

so the result:

SW#sh authentication sessions int gi1/0/2

Interface MAC Address Method Domain Status Fg Session ID
———————————————————————-
Gi1/0/2 b8ca.3a7e.0f5a N/A UNKNOWN Unauth C0A80AFC00000FB4034126C2

Key to Session Events Blocked Status Flags:

A – Applying Policy (multi-line status for details)
D – Awaiting Deletion
F – Final Removal in progress
I – Awaiting IIF ID allocation
N – Waiting for AAA to come up
P – Pushed Session
R – Removing User Profile (multi-line status for details)
U – Applying User Profile (multi-line status for details)
X – Unknown Blocker

Runnable methods list:
Handle Priority Name
16 5 dot1x
18 10 mab
21 15 webauth
–More–


And if you check on the ISE:

SWTEST(config)#aaa authentication dot1x default group radius
SWTEST(config)#aaa accounting dot1x default start-stop group radius
SWTEST(config)#aaa authorization network default group radius
SWTEST(config)#radius-server attribute 8 include-in-access-req
SWTEST(config)#! enable D dot1x
SWTEST(config)#dot1x system-auth-control
SWTEST(config)#int gi1/0/2
SWTEST(config-if)#shut
SWTEST(config-if)#switchport host
switchport mode will be set to access
spanning-tree portfast will be enabled
channel group will be disabled

SWTEST(config-if)#authentication host-mode multi-auth
SWTEST(config-if)#authentication open
SWTEST(config-if)#authentication periodic
SWTEST(config-if)#authentication timer reauthenticate server
SWTEST(config-if)#dot1x pae authenticator
SWTEST(config-if)#dot1x timeout tx-period 10
SWTEST(config-if)#authentication port-control auto
SWTEST(config-if)#no shut
SWTEST(config-if)#
SWTEST(config-if)#
SWTEST(config-if)#exit
SWTEST(config)#do sh dot1x all
Sysauthcontrol Enabled
Dot1x Protocol Version 3

Dot1x Info for GigabitEthernet1/0/2
———————————–
PAE = AUTHENTICATOR
QuietPeriod = 60
ServerTimeout = 0
SuppTimeout = 30
ReAuthMax = 2
MaxReq = 2
TxPeriod = 10

SW1(config)#enable secret YourPassword
SW1(config)#aaa new-model
SW1(config)#aaa authentication login default enable

SW1(config)#radius server ISE
SW1(config-radius-server)#address ipv4 192.168.10.6 auth port 1812 acct-port 1813
SW1(config-radius-server)# key …..

SW1(config)#aaa group server radius ISE-group
SW1(config-sg-radius)#server name ISE

SW1(config)#radius-server vsa send authentication

SW1#test aaa group ISE-group hamid YourPassword new-code


AAA

debug radius
debug tacacs
show aaa-server protocol PROTOCOL_NAME
test aaa-server

Access Control Lists

show access-list
show run | include ACCESS_LIST_NAME
show run object-group
show run time-range

Application Inspection

show conn state STATE_TYPE detail
show service-policy

Configuring Interfaces

show firewall
show int
show int ip brief
show ip
show mode
show nameif
show run interface INTERFACE_NAME
show version

Connections and Translations

clear xlate
show conn
show conn detail
show local-host all
clear local-host all (clears all connections)
show log
show run | begin policy-map
show run global
show run nat
show xlate
test regex

Failover

debug fo rxip
debug fo txip
show failover
show ip

IP Routing

deug ospf event
debug rip
show ospf database
show ospf interface
show ospf neighbor
show ospf PROCESS_ID
show ospf virtual-links
show route

Multicast

show igmp interface
show mroute
show pim interface
show pim neighbor

PKI

debug crypto ca messages
debug crypto ca transactions
show crypto ca certificates
show crypto ca crls
show crypto key mypubkey rsa

Quality of Service

show priority-queue statistics
show run class-map
show run policy-map
show service-policy global
show service-policy interface INTERFACE_NAME
show service-policy priority
show service-policy shape

Security Contexts

show admin-context
show context
show mode

System Management

show clock
show crypto key mypubkey rsa
show logging
show ntp status
show running-config
show snmp-server statistics
show ssh sessions
show startup-config

Transparent Firewall

debug arp-inspection
debug l2-indication
debug mac-address-table
show access-list
show arp-inspection
show conn
show firewall
show mac-address-table

VPNs

debug crypto ipsec
debug crypto isakmp
show crypto ipsec sa
show crypto isakmp sa detail
show route

WebVPN

debug menu wbvpn
debug ssl cipher
show vpn-sessiondb summary
show vpn-sessiondb webvpn


Useful Commands

(config)#more system:running-config| inc pre-shared
(config)# vpnsetup

Introduction

The Cisco IOS Zone Based Firewall is one of the most advanced form of Stateful firewall used in the Cisco IOS devices. The zone based firewall (ZBFW) is the successor of Classic IOS firewall or CBAC (Context-Based Access Control). Cisco first implemented the router-based stateful firewall in CBAC where it used ip inspect command to inspect the traffic in layer 4 and layer 7.

Even though ASA devices are considered as the dedicated firewall devices, Cisco integrated the firewall functionality in the router which in fact will make the firewall a cost effective device. The zone based firewall came up with many more features that is not available in CBAC. The ZBFW mainly deals with the security zones, where we can assign the router interfaces to various security zones and control the traffic between the zones. Also the traffic will be dynamically inspected as it passes through the zones. In addition to all the features which is available in classic IOS firewall, Zone based firewall will support Application inspection and control for HTTP, POP3, Sun RPC, IM Applications and P2P File sharing.

For advanced configuration of IOS Zone Based Firewall refer http://yadhutony.blogspot.in/2013/08/zone-based-firewall-advanced_4036.html

Zone Based Firewall Vs CBAC

CBAC Zone Based Firewall
Interface Based Configuration Zone Based Configuration
Controls Inbound and Outbound access on an interface Controls Bidirectional access between zones.
Uses inspect statements and stateful ACLs Uses Class-Based Policy language
-Not supported- Support Application Inspection and Control
Support from IOS Release 11.2 Support from IOS Release 12.4 (6) T
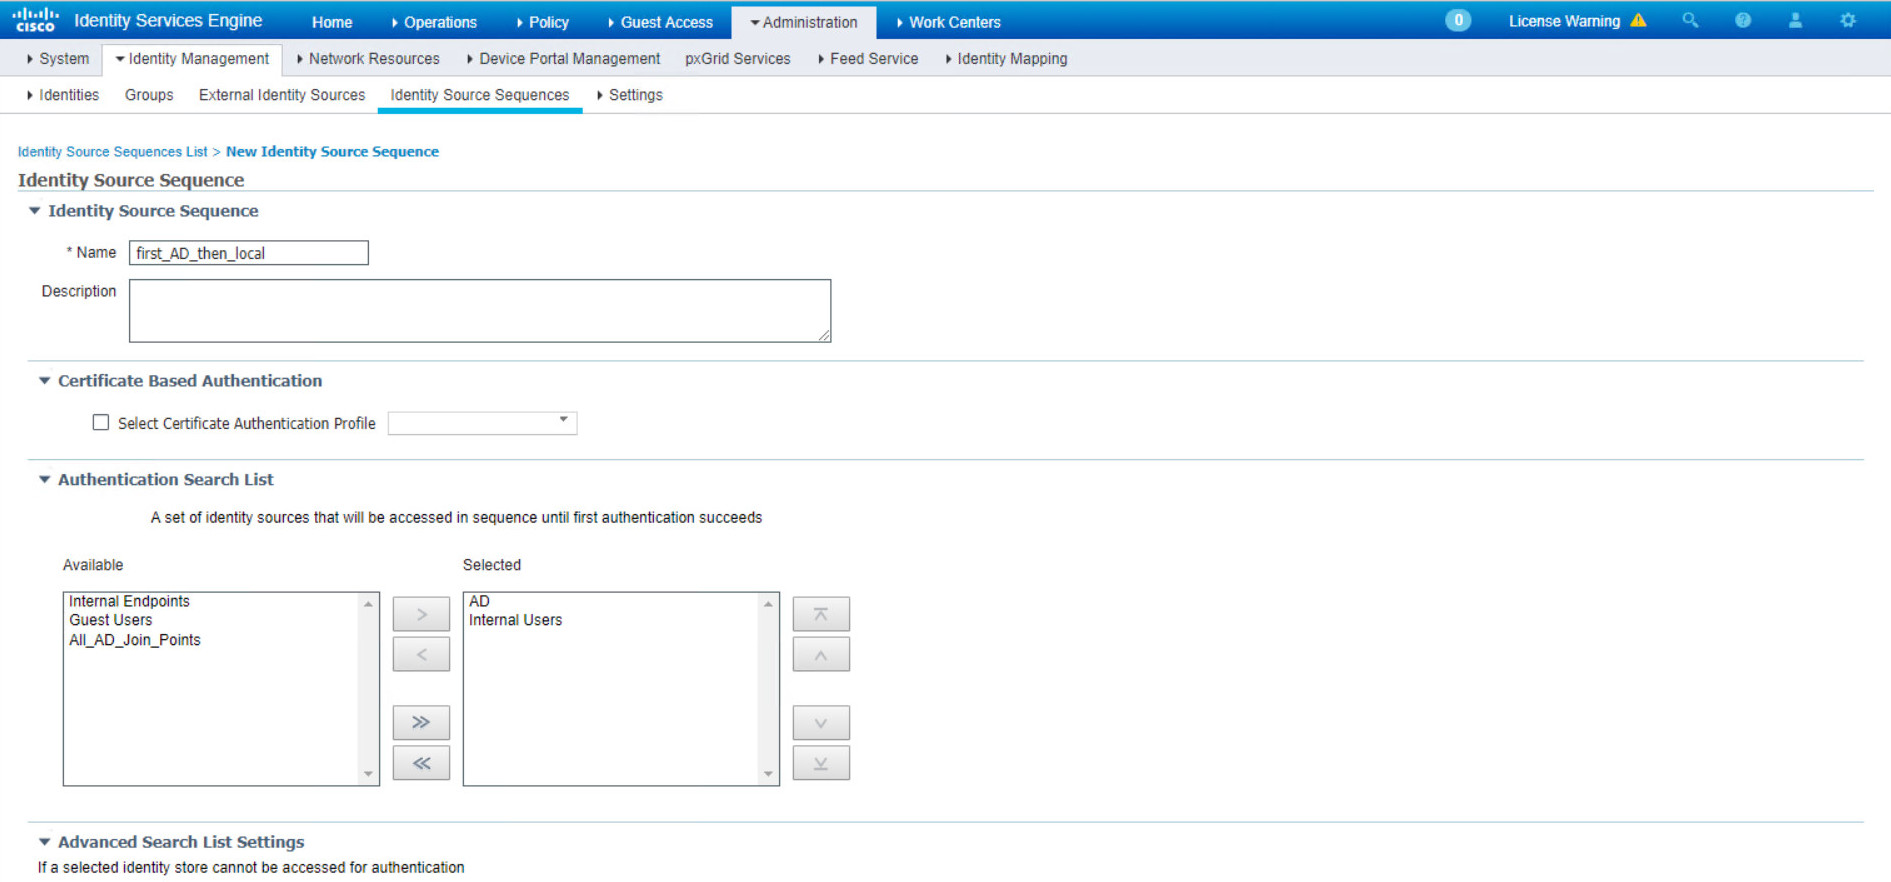
  • This document will guide you to configure a basic Zone Based Policy Firewall in an IOS router. Here I am going to divide the entire configuration into logical sets and finally will combine them to the get the full configuration.

ZBFW Configuration Procedure

The below are the configuration tasks that you need to follow:

  1. Configure Zones
  2. Assign Router Interfaces to zones
  3. Create Zone Pairs
  4. Configure Interzone Access Policy (Class Maps & Policy Maps)
  5. Apply Policy Maps to Zone Pairs

Configuration Scenario

Figure 1.

zbf_ntwrk_dgm.jpg

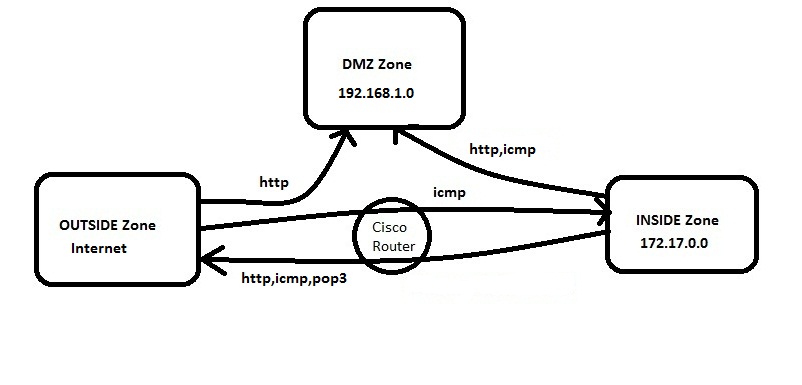
In this example we have three zones.

  • Inside Zone – Private LAN
  • DMZ Zone – DMZ hosts
  • Outside Zone – Internet

Here I am defining a rule set for our ZBFW:

1. From Inside to Outside –http,icmp and pop3 is allowed

2. From Outside to Inside –icmp is allowed

3. From Inside to DMZ –http and icmp is allowed

4. From Outside to DMZ –http is allowed

Default Rules of Zone Based Firewall

  1. Interzone communication is Denied, traffic will be denied among the interfaces that are in the different zones unless we specify a firewall policy.
  2. Intrazone communication is Allowed, traffic will flow implicitly among the interfaces that are in the same zone.
  3. All traffic to Self zone is Allowed

Self Zone is created automatically by the router while we create the other zones in a Zone Based Firewall.

Task 1 : Configure Zones

In this example (refer Figure 1) we have three zones. Inside ,Outside, DMZ.

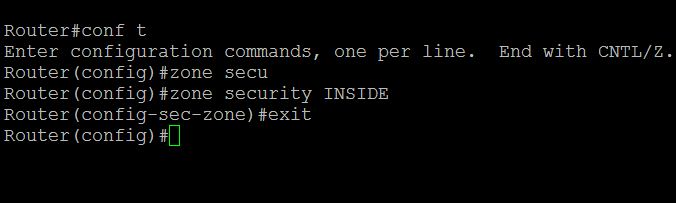
To configure zones in a router, connect the router via putty or console, switch to the global configuration mode and type the command as below:

Router(config)#zone security INSIDE

Router(config)#zone security OUTSIDE

Router(config)#zone security DMZ

zbf1.JPG

Task 2 : Assign Router Interfaces to Zones

We have to assign the router interface to a particular zone. Here I am going to assign Gigabyte Ethernet 0/0 to INSIDE zone , Ge0/1 to OUTSIDE zone and Ge0/2 to DMZ zone.

To achieve this we have to go to the particular interface and attach that interface to the zone.Type the command as below:

Router(config)#interface gigabitEthernet 0/0

Router(config-if)#zone-member security INSIDE

Router(config)#interface gigabitEthernet 0/1

Router(config-if)#zone-member security OUTSIDE

Router(config)#interface gigabitEthernet 0/2

Router(config-if)#zone-member security DMZ

zbf2.JPG

Now if you try to ping a zone from another zone the traffic will be denied because of the default firewall policy.

Task 3 : Create Zone Pairs

Zone pairs are created to connect the zones. If you want to make two zones to communicate you have to create Zone pairs. DO NOT create zone pairs for non-communicating zones. In our scenario the traffic flows between :

  • INSIDE to OUTSIDE
  • OUTSIDE to INSIDE
  • OUTSIDE to DMZ
  • INSIDE to DMZ

So we need to create four zone pairs. To create zone pairs the command is as follows.

Router(config)#zone-pair security IN-TO-OUT source INSIDE destination OUTSIDE

Router(config)#zone-pair security OUT-TO-IN source OUTSIDE destination INSIDE

Router(config)#zone-pair security OUT-TO-DMZ source OUTSIDE destination DMZ

Router(config)#zone-pair security IN-TO-DMZ source INSIDE destination DMZ

zbf3.JPG

Task 4 : Configure Interzone Access Policy

Interzone Access policy is the key part of a Zone based firewall where we classify the traffic and apply the firewall policies. Class map and Policy map configurations are carried out during this task.

Class Maps : This will classify the traffic

Policy Maps : This will decide the ‘fate’ of the traffic

Class Map Configuration

Class map sort the traffic based on the following criteria 1.) Access-group 2.) Protocol 3.) A subordinate class map. In our scenario I am sorting the traffic based on access group. So first we need to create an ACL and associate it with the class map.

a.) Class Map for INSIDE-TO-OUTSIDE

Router(config)#ip access-list extended INSIDE-TO-OUTSIDE

Router(config-ext-nacl)#permit tcp 172.17.0.0 0.0.255.255 any eq www

Router(config-ext-nacl)#permit tcp 172.17.0.0 0.0.255.255 any eq pop3

Router(config-ext-nacl)#permit icmp 172.17.0.0 0.0.255.255 any

Router(config)#class-map type inspect match-all INSIDE-TO-OUTSIDE-CLASS

Router(config-cmap)#match access-group name INSIDE-TO-OUTSIDE

or

[ you can group the protocols as below:

class-map type inspect match-any INSIDE-TO-OUTSIDE-CLASS

description Allowed_Protocol_From_INSIDE_to_OUTSIDE

match protocol https

match protocol dns

match protocol udp

match protocol tcp

match protocol pop3

match protocol smtp

match protocol icmp ]

b.) Class Map for OUTSIDE-TO-INSIDE

Router(config)ip access-list extended OUTSIDE-TO-INSIDE

Router(config-ext-nacl)#permit icmp any 172.17.0.0 0.0.255.255

Router(config)#class-map type inspect match-all OUTSIDE-TO-INSIDE-CLASS

Router(config)#match access-group name OUTSIDE-TO-INSIDE

c.) Class Map for OUTSIDE-TO-DMZ

Router(config)#ip access-list extended OUTSIDE-TO-DMZ

Router(config-ext-nacl)#permit tcp any 192.168.1.0 0.0.0.255 eq www

Router(config)#class-map type inspect match-all OUTSIDE-TO-DMZ-CLASS

Router(config)#match access-group name OUTSIDE-TO-DMZ

d.) Class Map for INSIDE-TO-DMZ

Router(config)#ip access-list extended INSIDE-TO-DMZ

Router(config-ext-nacl)#permit tcp 172.17.0.0 0.0.255.255 192.168.1.0 0.0.0.255 eq www

Router(config-ext-nacl)#permit icmp 172.17.0.0 0.0.255.255 192.168.1.0 0.0.0.255

Router(config)#class-map type inspect match-all INSIDE-TO-DMZ-CLASS

Router(config-cmap)#match access-group name INSIDE-TO-DMZ

zbf4.JPG

zbf5.JPG

Policy-Map Configuration

Policy-Maps will apply the firewall policy to the class map that is configured previously. Three actions can be taken aganist the traffic with the policy-map configuration:

  • Inspect : Dynamically inspect the traffic.
  • Drop : Drop the traffic
  • Pass : Simply forward the traffic.

There will be a drop policy, by default, at the end of all policy maps.

a.) Policy-map for INSIDE-TO-OUTSIDE

Router(config)#policy-map type inspect INSIDE-TO-OUTSIDE-POLICY

Router(config-pmap)#class type inspect INSIDE-TO-OUTSIDE-CLASS

Router(config-pmap)#inspect

Router(config-pmap)#class class-default

Router(config-pmap)#drop log

b.) Policy-map for OUTSIDE-TO-INSIDE

Router(config)#policy-map type inspect OUTSIDE-TO-INSIDE-POLICY

Router(config-pmap)#class type inspect OUTSIDE-TO-INSIDE-CLASS

Router(config-pmap)#pass

Router(config-pmap)#class class-default

Router(config-pmap)#drop log

c.) Policy-map for OUTSIDE-TO-DMZ

Router(config)#policy-map type inspect OUTSIDE-TO-DMZ-POLICY

Router(config-pmap)#class type inspect OUTSIDE-TO-DMZ-CLASS

Router(config-pmap)#inspect

Router(config-pmap)#class class-default

Router(config-pmap)#drop log

d.) Policy-map for INSIDE-TO-DMZ

Router(config)#policy-map type inspect INSIDE-TO-DMZ-POLICY

Router(config-pmap)#class type inspect INDISE-TO-DMZ-CLASS

Router(config-pmap)#pass

Router(config-pmap)#class class-default

Router(config-pmap)#drop log

zbf6.JPG

Task 5 : Apply policy maps to zone pairs

Now we have to attach the policy maps to the zone pairs that we have already created. The command is as follows:

Router(config)#zone-pair security IN-TO-OUT source INSIDE destination OUTSIDE

Router(config-sec-zone-pair)#service-policy type inspect INSIDE-TO-OUTSIDE-POLICY

Router(config)#zone-pair security OUT-TO-IN source OUTSIDE destination INSIDE

Router(config-sec-zone-pair)#service-policy type inspect OUTSIDE-TO-INSIDE-POLICY

Router(config)#zone-pair security OUT-TO-DMZ source OUTSIDE destination DMZ

Router(config-sec-zone-pair)#service-policy type inspect OUTSIDE-TO-DMZ-POLICY

Router(config)#zone-pair security IN-TO-DMZ source INSIDE destination DMZ

Router(config-sec-zone-pair)#service-policy type inspect INSIDE-TO-DMZ-POLICY

zbf7.JPG

There we finish the basic configuration of a zone based firewall.

Troubleshooting

You can use the below commands to perform some basic troubleshooting and verification.

a.) Show commands

show class-map type inspect

show policy-map type inspect

show zone-pair security

b.) Debug Commands

debug policy-firewall detail

debug policy-firewall events

debug policy-firewall protocol tcp

debug policy-firewall protocol udp

Advanced Zone Based Firewall Configuration

Here you can find some examples of advanced Zone Based Firewall configuration.

1. Advanced Zone Based Firewall Configuration : http://yadhutony.blogspot.in/2013/08/zone-based-firewall-advanced_4036.html

2. IOS Content Filtering : http://yadhutony.blogspot.in/2013/02/cisco-ios-local-content-filtering.html

3. P2P and IM Application control : http://yadhutony.blogspot.in/2012/11/how-to-block-p2p-traffic-on-cisco-router.html

You can visit http://www.cisco.com/en/US/docs/ios-xml/ios/sec_data_zbf/configuration/15-1s/sec-zone-pol-fw.html for more details.

Thank you for viewing this document.

RIP

  • Maximum hop count 15
  • RIP ( 30 Sec update to other routers)
  • Doesn’t analyse traffi
  • Distance Vector
  • RIPng( send through hex to other routers FF2::9)

EIGRP

  • Only to Cisco Protocol
  • Distance vector
  • Analyses traffic
  • Autonomous system limitation
  • Pays attention to bandwidth too. up to 15 routers is good
    in fact, with the same autonomous number routers can speak together. if autonomous number of one of routers is different. The network will be down.

OSPF

  • Larger Network
  • Link state(Dikestra- Shortest path first)
  • Very scalable
  • Uses area instead of autonomous
  • Each area no more 15 routers

Configure rip V2
conf t
(config)# router rip
(config)# version 2
(config)# net 10.1.1.4
(config)# net 192.168.1.0
(config)# no auto-summary

Important command
conf t
(config)# do sh start ( with do that is not necessary to be out)
(config)# do sh ip int br ( good)
(config)# do sh protocols( show protocols )
(config)# do sh controllers ( hardware information)
(config)# do sh ip rip
(config)# do sh ip route

debug ip rip( behind scence)
no debug ip rip

Set IPV6 for
conf t
(config)# ipv6 unicast-routing ( for writing ipv6)
(config)# int f0/0
(config)# ipv6 address 2001:3200….

For IPV6
conf t
(config)# ipv6 router rip 1
(config)# int f0/0
(config)# ipv6 rip 1 enable

sh ipv6 route

RIP timer
router rip timers basic 30(interval between update) 180(Invalid) 180(Holddown) 240(Flush)

conf t
(config)# router eigrp 100(autonomous number can share update in the same autonomous system)
(config)# net 192.168.10.10
(config)# net 10.10.10.0.1
(config)# no auto-summary

conf t
(config)# router ospf 100(process ID)
(config)# net 192.168.1.0 0.0.0.255(inverse subnetmask=wildmask card) area 0
(config)# net 10.1.1.4 0.0.0.3 area 0

show ip ospf neighbour

There are several commands on Cisco, I have tried to collect some effective commands:

Banner
conf t
banner motd #Unauthorized access to this device is prohibited!#

Password for console
conf t
(config)# line console 0
(config)# password yourpassword
(config)# login

Password for vty
conf t
(config)#line vty 0
(config)#password myvty0
(config)#login

Password for vty
conf t
(config)# line vty 1 4
(config)# password myvty
(config)# login

Secure access for previlage mode
conf t
(config)# enable password yourpassword
(config)# enable secret Mysecretpasword //encrypted

Secure all password

conf t
(config)#service password-encryption

Creating Vlans
conf t
(config)# int vlan1
(config)# ip address 192.168.1.2. 255.255.255.0
(config)# no shut
(config)# do wr

Default Gateway
conf t
(config)# ip default-gateway 192.168.1.1
(config)# no shut
(config)# do wr

Speed Control
conf t
(config)#int f0/2
(config)#speed 100
(config)#duplex full

Port Security
conf t
(config)# int fa0/2
(config)# switchport mode access
(config)# switchport port-security mac-address sticky
(config)# switchport port-security maximum 1
(config)# switchport port-security violation shutdown

Useful command for port security
show port-security address
show port-security in fa0/2

Create Vlan
conf t
(config)# vlan 100
(config)# name wireless

show vlan brief

Access port to Vlan

conf t
(config)# int fa0/3
(config)# switchport access vlan 100

Range of port to Vlan

conf t
(config)# int range fa0/5-9
(config)# switchport access vlan 200

Trunk
Trunk is a port which is not member of any vlans

conf t
(config)# int f0/24
(config)# switchport mode trunk

Trunk Useful Command
show int trunk

Show command
show mac-address-table ( shows mac switch)
sh running-config //config stored in RAM
sh startup-config //config stored in NVRAM
sh flash // display memory flash
sh version // all info about device

erase startup-config //erase router config completely

Static Routing

Recursive
(Destination Network) (Subnet mask) (next hub(enter))

Direct
(Destination Network) (Subnet mask) (exit interface)
ip route 192.168.3.0 255.255.255.0 serial0/0/0

Access List

conf t
(config)# ip access-list extended 100
(config)# deny tcp host 172.16.1.2 any eq 80
(config)# permit tcp host 172.16.1.2 any eq telnet
(config)# permit ip any any
(config)# exit
(config)# int f0/0
(config)# ip access-group 100 inbound


conf t
(config)# ip access-list extended Nohttp
(config)# deny tcp 172.16.1.2 0.0.0.0 any eq www
(config)# permit tcp any any
(config)# exit
(config)# int f0/0
(config)# ip access-group Nohttp inbound