Technology: Network Security
Area: Next Generation Firewalls
Vendor: Cisco
Software: 8.X, 9.X, FMC 5.X, 6.X, SFR module 5.X , 6.X
Platform: Cisco ASA, Firepower Management Center VM

Firepower Management Center installation steps

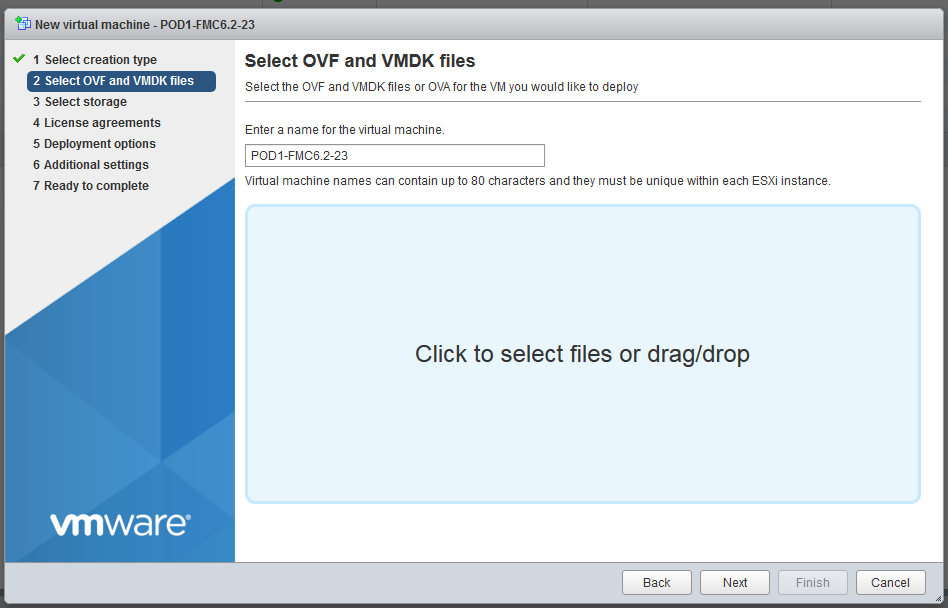
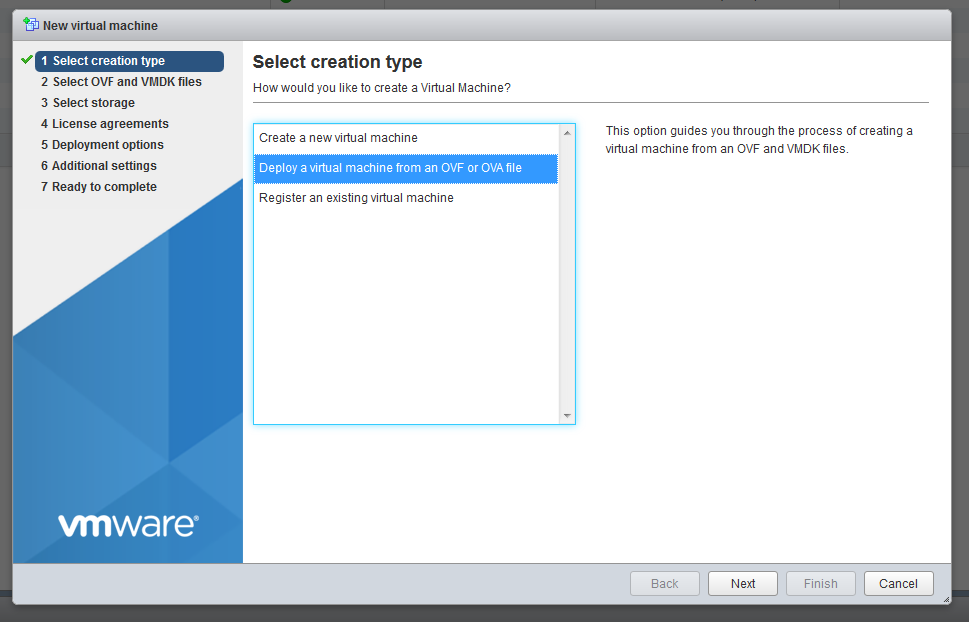
1. Deployment from OVF

FMC installation step 1


2. Assign the hostname for VM

fmc installation step 2

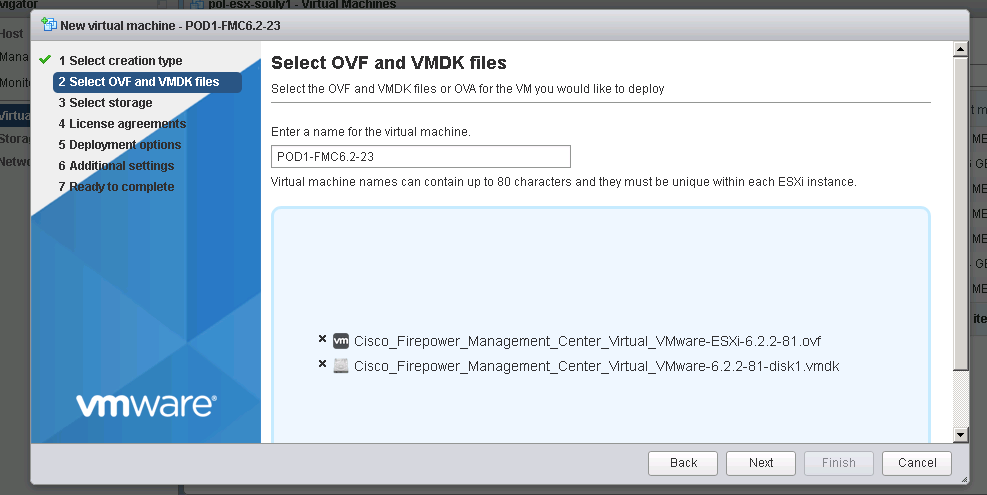
3. Choose the right ovf and vmdk files

FMC installation step 3


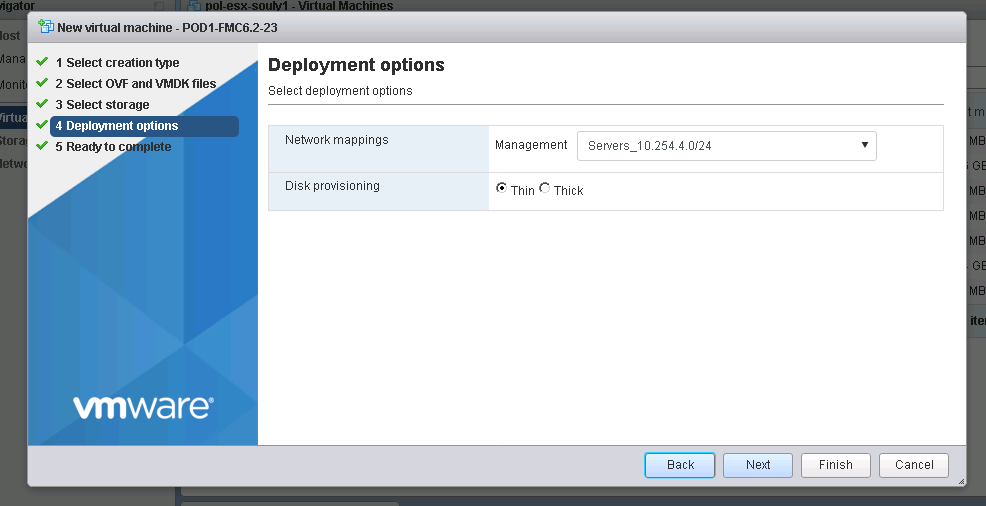
4. Select proper vNIC (the one you will use for management purposes and communication with the sensor) and disk provisioning type

FMC installation step 5


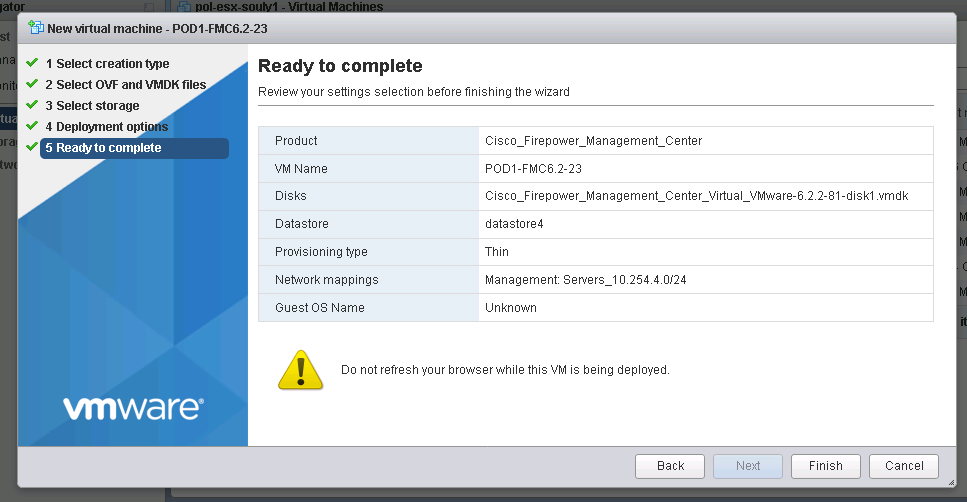
5. VM Deployment is finished

FMC installation step 6


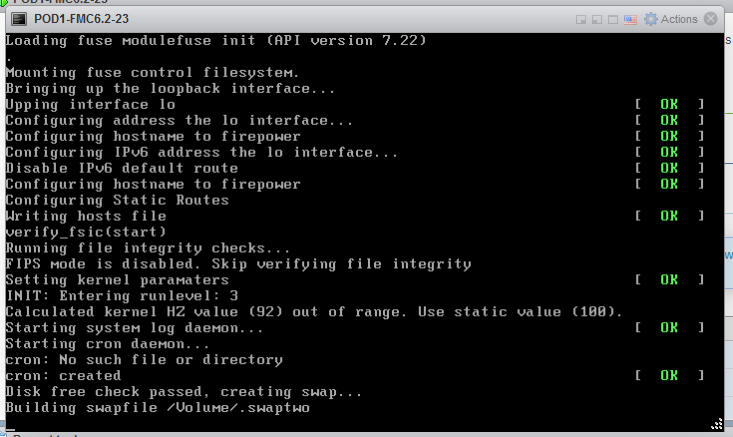
6. VM starts the installation

FMC installation step 7


Note: The Cisco Firepower Management Center Virtual instance then appears under the specified data center in the Inventory. Booting up the new VM could take up to 30-40 minutes.


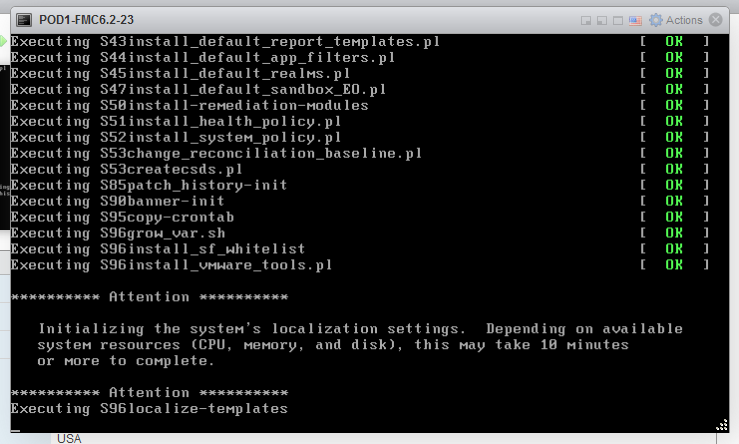
7. After about 20 minutes you will see the system first initialization message

FMC installation step 8


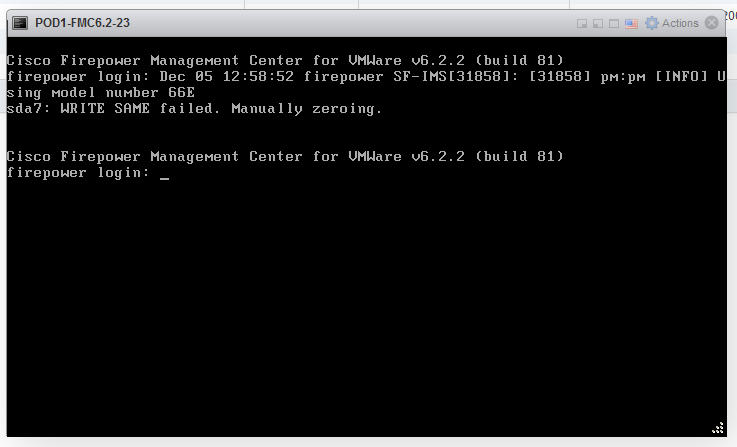
8. After installation is complete, the firepower login prompt appears.

Note: A message “WRITE SAME failed. Manually zeroing.” may appear after the system is booted up for the first time. This does not indicate a defect, it correctly indicates that the VMware storage driver does not support the WRITE SAME command.  The system displays this message, and proceeds with a fallback command to perform the same operation

FMC installation step 9


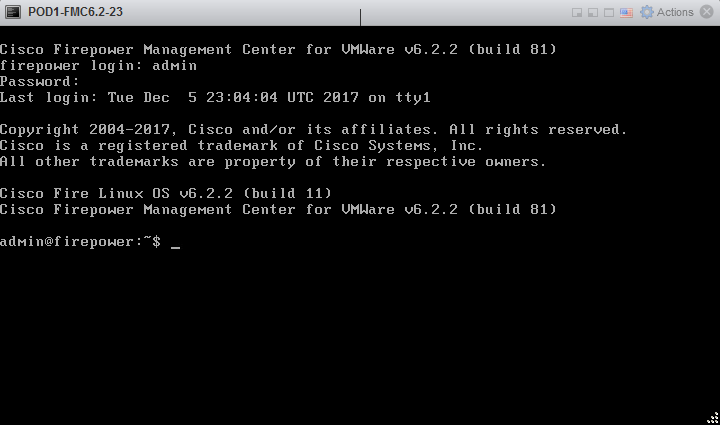
Default user and password for version 6.x FMC and later

  • Username: admin
  • Password: Admin123


9. First login and setup

FMC installation step 10


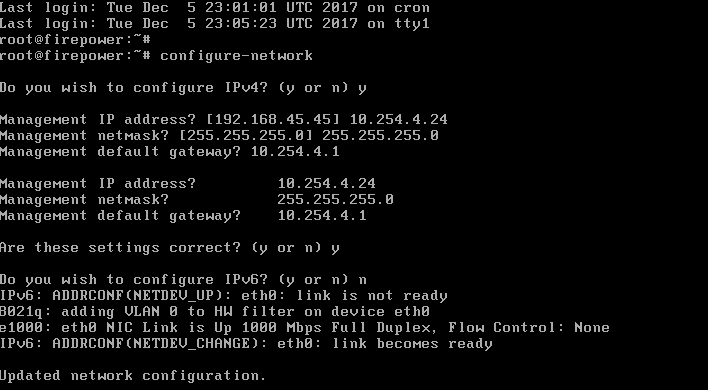
10. Setup of FMC – CLI (you might be prompted for sudo password then provide the same password as used when loging in)

FMC installation step 11


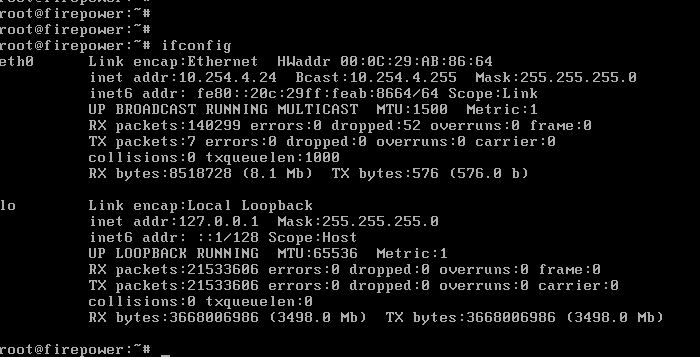
11. Checking the interfaces on FMC and ensuring proper addressing:

FMC installation step 12


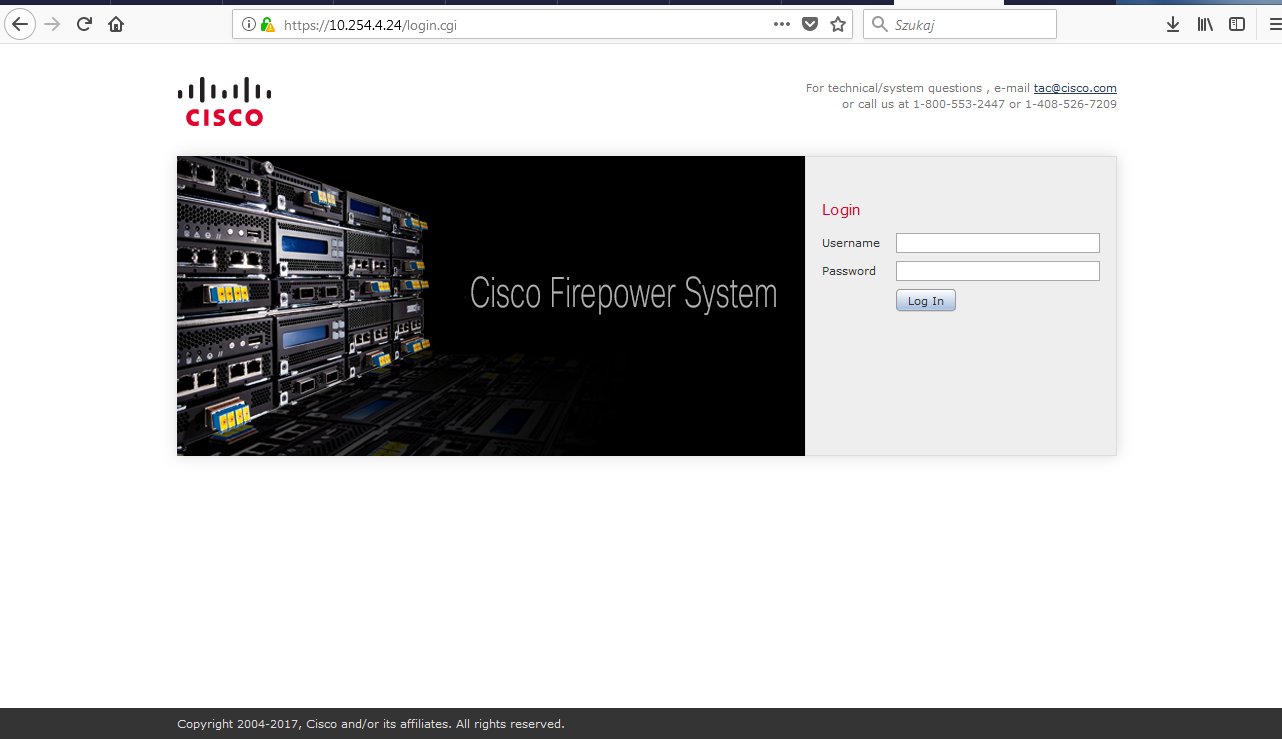
12. First GUI login comes up after typing the IP address (or FMC’s FQDN) set during installation. To login use exactly the same credentials as used for CLI login.

FMC installation step 13

For this post, we will be discussing migrating an ASA with FirePOWER services to a Firepower Threat Defense (FTD) image on an ASA 5506-X appliance. At a high level, you reimage the ASA unit with a FTD then use the migration tool (if you have an existing ASA configuration) to import the ASA configuration into the new FTD configuration.

Let’s start with some of the pre-requirements for the re-image process. First, backup the ASA configuration along with the ASA, ASDM, and FirePOWER software. You can do this with a full backup through the ASA ASDM or CLI. Also, backup any license files or keys you may have for the ASA and make sure the ASA’s ROMMON version is 1.1.8 or greater (if not then upgrade it). Secondly, download the FTD boot image and install package software (the file names will vary depending on ASA model). Lastly, make sure you have console access to your ASA unit.

Now let’s go through the ASA to FTD re-image process. You can refer to this link from Cisco for details of this process and I will refer back to it throughout this blog: https://www.cisco.com/c/en/us/td/docs/security/firepower/quick_start/reimage/asa-ftd-reimage.html.

Step 1: Reboot the ASA and get into the ROMMON prompt. You can break into ROMMON by pressing ESC when prompted to during the reboot.

Step 2: Setup a TFTP server on your laptop or LAN then while in ROMMON, configure the ASA interface with an IP address that is accessible by the TFTP server.  You will use this to load the FTD boot image into the ASA unit.  The interface you configure does vary depending on the ASA model, so check the link in the beginning of the section for details.

For this lab, I’m using an ASA 5506-X so it will not allow me to choose an interface. All interface configuration is applied to the management interface. Also, the TFTP server is on my laptop so I set the gateway as the same as the TFTP server address.

Commands in ROMMON to run at this step:

  • rommon #0> address <ip address>
  • rommon #1> server <tftp server IP address>
  • rommon #2> gateway <gateway IP address>
  • rommon #3> file <boot image file name>
  • rommon #4> set

Step 3: Once the interface is configured, make sure you can ping the TFTP server to verify network connectivity then download the FTD boot image.

Commands in ROMMON to run at this step:

  • rommon #5> sync
  • rommon #6> tftpdnld

 After the ‘tftpdnld’ command is ran the FTD boot image will download and reboot the ASA into the FTD Boot CLI

Step 4: Setup an HTTP or FTP server on your laptop or network for to install the FTD systems install package to the ASA. In the FTD boot CLI, run the ‘setup’ command and it step you through configuring network settings for the install.

Step 5: Once the ASA’s network settings is configured then install the system image using the ‘system install’ command.

Commands for this step:

system install [noconfirm] http://<ip address of tftp server>/<ftd system image file name>

The noconfirm allows you not to respond to confirmation messages from during the install.

The install can take some time so grab a cup of coffee and be prepared to wait. Once the install is done, the ASA will reboot and bring up the FTD CLI prompt.

You have now re-imaged an ASA unit with a FTD image. At this point you can log into the on-box management GUI, Firepower Device Manager (FDM), or you can add the ASA to the Firepower Management Center (FMC) as you would normally add a Firepower device. For this blog, I will be using FDM to manage FTD.

Lastly, let’s confirm we can log into the FDM portal. By default, FTD assigns the management interface for the ASA unit with an IP address of 192.168.45.45 and has DHCP server enabled on it. You can plug your laptop into the management port and receive an IP address on that subnet.

Browse to https://192.168.45.45 and log into FDM with the default username and password, admin/Admin123.

After you log into FDM, you will be prompted to change the password and accept the EULA. It will then run you through a wizard for initial configuration.

For the last part of this blog, we will look (at high-level overview) into the ASA to FTD configuration migration tool. If you have an existing ASA configuration that you need to migrated to FTD, you can use this tool to help migrate some of the ASA configuration to FTD. There are some caveats to this and we will discuss them in a moment after we go over the migration process.

For the configuration migration, you will first want to back up the ASA configuration file in a .cfg or .txt format first then make sure the ASA code level is at least on 9.1 version and ASDM on version 7.1. The migration tool is a feature you enable on a Firepower Management Console (FMC) VM, which should not be a Production FMC since it only allows to use the migration tool features. If it is done a production VM, the FMC will require a re-image to be able to in order to un-install the migration tool. Make sure the migration tool is the same major and minor release as the production FMC that you will import the configuration into. For example, if your FMC is running 6.2.0.2 then the version of FMC that the migration tool is running on needs to be 6.2.0.2 as well. You will then run the ASA configuration file through migration tool and download the .sfo file, then import that into the Production FMC. You can use the imported configuration to set up an Access Control Policy to apply to the FTD device.

Now to the caveats and limitation of what ASA configuration parameters the tool converts. Here is a list of what ASA configurations the tool supports:

  • Extended access rules
  • Twice NAT statements
  • Object NAT statements
  • Network objects/groups and service objects/groups that are associated with extended access rules and NAT statements which the tool coverts

Here is a list of the tool’s limitations:

  • It migrates only ASA configurations. It does not migrate FirePOWER services configuration, these policies will have to be migrated manually.
  • It can support up to 2000000 total access rules, if there is more ACEs than what is stipulated then the migration will fail.
  • It will migrate ACLs that are applied to interfaces only. You can check on which ACLs are applied to interfaces by running a ‘show run access-group’ command.
  • The tool only coverts objects that are used in ACLs that are applied to interfaces and NAT statements migrated. It does not migrated objects alone.
  • It does not migrate EtherType or WebType ACLs, ACEs that use host address name aliases (defined by the ‘name’ command), and ACEs that use default service objects.
  • It will covert, but disable ACEs that include the following: time-range objects, Fully-qualified domain names (FQDN), Local users or user groups, Security group (SGT) objects, and Nested service groups for both source and destination ports. It disables these rules since FTD does not have an equivalent functionality for these parameters. For a disabled rule, you can edit it to meet supported FTD configuration.

As you can see the FTD migration tool will aid you in migrating an existing ASA configuration to an FTD deployment. Keep in mind that it will not convert everything in the ASA configuration and there will be at some manual migration, but the tool will save you some time and provide you with a good starting point for your migration!


source: egroupcloud.com
R1
—————–
(config)#crypto pki certificate map CAMP 1
#issuer-name co talebi

(config)# default crypto ikev2 proposal
(config)# crypto ikev2 proposal default
# encryption aes-cbc-256
# integrity sha256
# group 14

(config)# default crypto ikev2 policy

(config)# crypto ikev2 profile IKEV2-Profile
# identity local dn
# match certificate CMAP
# authentication remote rsa-sig
# authentication local rsa-sig
# pki trustpoint Trusted-cA
# virtual-template 1

(config)# default crypto ipsec transform-set

(config)# crypto ipsec transform-set default esp-gcm 256

(config)# default crypto ipsec profile
(config)# crypto ipsec profile default
(config)# set ikev2-profile IKEV2-Profile
(config)# interface virtual-template 1 type tunnel
#ip unnumbered loop 0
#tunnel source eth0/0
#tunnel mode ipsec ipv4
#tunnel protection ipsec profile default
#ip ospf 1 area 0

R2
—————–
(config)#crypto pki certificate map CAMP 1
#issuer-name co talebi

(config)# default crypto ikev2 proposal
(config)# crypto ikev2 proposal default
# encryption aes-cbc-256
# integrity sha256
# group 14

(config)# default crypto ikev2 policy

(config)# crypto ikev2 profile IKEV2-Profile
# identity local dn
# match certificate CMAP
# authentication remote rsa-sig
# authentication local rsa-sig
# pki trustpoint Trusted-cA

(config)# default crypto ipsec transform-set

(config)# crypto ipsec transform-set default esp-gcm 256

(config)# default crypto ipsec profile
(config)# crypto ipsec profile default
(config)# set ikev2-profile IKEV2-Profile

(config)# interface Tunnel0
#ip unnumbered loop 0
#tunnel source eth0/0
#tunnel destination 15.0.0.1
#tunnel mode ipsec ipv4
#tunnel protection ipsec profile default
#ip ospf 1 area 0

Verify your tunnel
—————-
#show crypto engine connections active
#show crypto ikev2 sa

Troubleshooting

—————-

show crypto ikev2 stats
show crypto ikev2 stats exchange
show crypto ikev2 proposal
show crypto ipsec profile
show crypto ipsec sa
show crypto session

-Proposal ==>Dephi Helman Group – Encryption – Integrity
-Policy
-Profile (match), (keyring)

show crypto ikev2 proposal default
show crypto ikev2 policy default
show crypto ikev2 transform-set default
show crypto ipsec profile default

Changing the default proposal

(config)# crypto ikev2 proposal default
(config-ikev2-proposal)# encryption aes-cbc-256
(config-ikev2-proposal)# integrity sha256
(config-ikev2-proposal)# group 2

revert back the default proposal
(config)# default crypto ikev2 proposal

R1–>25.0.0.1
——————–

(config)# crypto ikev2 proposal default
(config-ikev2-proposal)# encryption aes-cbc-256
(config-ikev2-proposal)# integrity sha256
(config-ikev2-proposal)# group 2

(config)# crypto ikev2 keyring Our-keys
# peers R2
# address 25.0.0.2
# identity address 25.0.0.2
# pre-shared-key local cisco123
# pre-shared-key remote cisco 123

(config)# crypto ikev2 profile default
# match identity remote address 25.0.0.2
# identity local address 25.0.0.1
# authentication local pre-share
# authentication remote pre-share
# keyring local Our-keys
# lifetime 7200

(config)# crypto ipsec transform-set default esp-gcm 256

(config)# crypto ipsec profile default
#set pfs group20

(config)# int tunnel 5
#tunnel mode ipsec ipv4
#ip unnumbered loop 0
# tunnel source e0/0
# tunnel destination 25.0.0.2
# tunnel protection ipsec profile default

R2–>25.0.0.2
——————–

(config)# crypto ikev2 proposal default
(config-ikev2-proposal)# encryption aes-cbc-256
(config-ikev2-proposal)# integrity sha256
(config-ikev2-proposal)# group 2

(config)# crypto ikev2 keyring Our-keys
# peers R1
# address 25.0.0.1
# identity address 25.0.0.1
# pre-shared-key local cisco123
# pre-shared-key remote cisco 123

(config)# crypto ikev2 profile default
# match identity remote address 25.0.0.1
# identity local address 25.0.0.2
# authentication local pre-share
# authentication remote pre-share
# keyring local Our-keys
# lifetime 7200

(config)# crypto ipsec transform-set default esp-gcm 256

(config)# crypto ipsec profile default
#set pfs group20

(config)# int tunnel 5
#tunnel mode ipsec ipv4
#ip unnumbered loop 0
# tunnel source e0/0
# tunnel destination 25.0.0.1
# tunnel protection ipsec profile default

FlexVPN = IKEV2 + NGE(Next Generation Encryption)
IKEV1 = phase 1 => negotiate
phase 2 => IPSec Tunnel

IKEV2 => Initial neogtiation + IPSec Tunnel
=> proposals, key ring, policy, profile

#show crypto ikev2 proposal default
#show crypto ikev2 policy default

(config)# crypto ikev2 keyring HRT-keyring
peer container1
address 192.168.10.2
identity fqdn r2.test.local
pre-shared-key local cisco
pre-shared-key remote cisco123

(config)# crypto ikev2 profile HRT-profile
match identity remote fqdn r2.test.local
identity local fqdn r1.test.local
authentication local pre-share
authentication remote pre-share
keyring local HRT-keyring

(config)# crypto ipsec profile default
# set ikev2-profile HRT-profile

(config)# int tunnel 3
# tunnel source gi0/0
# tunnel destination 192.168.10.2
# tunnel mode ipsec ipv4
# tunnel protection ipsec profile default


(config)# crypto ikev2 keyring HRT-keyring
peer container1
address 192.168.10.1
identity fqdn r1.test.local
pre-shared-key local cisco123
pre-shared-key remote cisco

(config)# crypto ikev2 profile HRT-profile
match identity remote fqdn r1.test.local
identity local fqdn r2.test.local
authentication local pre-share
authentication remote pre-share
keyring local HRT-keyring

(config)# crypto ipsec profile default
# set ikev2-profile HRT-profile

(config)# int tunnel 3
# tunnel source gi0/0
# tunnel destination 192.168.10.1
# tunnel mode ipsec ipv4
# tunnel protection ipsec profile default


#show crypto ikev2 sa

#show crypto engine active connections

Branches with Static VTI
Hub : Dynamic VTI
– ISAKMP Profile
– Key ring with PSKs
– Virtual Template

R1(Hub)

(config)# crypto isakmp policy 1
(config-isakmp)# encr aes 192
(config-isakmp)# authentication pre-share
(config-isakmp)# group 5

(config)# crypto keyring HRT-PSKS
(config-keyrings)# pre-shared-key address 0.0.0.0(remote IP or all) key cisco123

(config)# crypto ipsec transform-set HRT-SET esp-aes 128 esp-md5-hmac

(config)# crypto ipsec profile HRT-IPSEC-PROFILE
(ipsec-profile)# set transform-set HRT-SET

(config)# interface virtual-template 1 type tunnel
(config-if)#tunnel mode ipsec ipv4
(config-if)#tunnel protection ipsec profile HRT-IPSEC-PROFILE

//if the address is 25.0.0.2 then use this template 1
(config)# crypto isakmp profile OUR-IKE-PROFILE
(config-isa-pro)# match identity address 25.0.0.2 255.255.255.255 (0.0.0.0 anything can connect)
(config-isa-pro)#virtual-template 1
(config-isa-pro)#keyring HRT-PSKS

R2 (branch-spoke)
——-
SVTI
(config)# crypto isakmp policy 1
(config-isakmp)# encr aes 192
(config-isakmp)# authentication pre-share
(config-isakmp)# group 5

(config)#crypto isakmp key cisco123 address 0.0.0.0

(config)#crypto ipsec tranform-set HRT esp-aes 128 esp-md5-hmac

(config)#crypto ipsec profile HRT-IPSEC-PROFILE
(ipsec-profile)# set transform-set HRT-SET

(config)#int tunnel 1
(config-if)# tunnel source serial 1/0
(config-if)# tunnel destination 15.0.0.1
(config-if)# tunnel mode ipsec ipv4
(config-if)# tunnel protection ipsec profile HRT-IPSEC-PROFILE

R1

(config)#crypto ipsec tranform-set HRT esp-aes 256 esp-sha-hmac
(cfg-crypto-trans)# mode tunnel

(config)#crypto ipsec profile P2P-PROFILE
(ipsec-profile)# set transform-set HRT

(config)#crypto isakmp policy 15
#encr aes 256
#authentication pre-share
#group 14
(config)#crypto isakmp key cisco123 address 0.0.0.0

(config)#int tunnel 1
(config-if)# tunnel source serial 1/0
(config-if)# tunnel destination 35.0.0.3
(config-if)# tunnel mode ipsec ipv4
(config-if)# tunnel protection ipsec profile P2P-PROFILE

R2

(config)#crypto ipsec tranform-set HRT esp-aes 256 esp-sha-hmac
(cfg-crypto-trans)# mode tunnel

(config)#crypto ipsec profile P2P-PROFILE
(ipsec-profile)# set transform-set HRT

(config)#crypto isakmp policy 15
#encr aes 256
#authentication pre-share
#group 14
(config)#crypto isakmp key cisco123 address 0.0.0.0

(config)#int tunnel 1
(config-if)# tunnel source serial 1/0
(config-if)# tunnel destination 15.0.0.1
(config-if)# tunnel mode ipsec ipv4
(config-if)# tunnel protection ipsec profile P2P-PROFILE

DMVPN IKE Call Admission Control
– To mitigate attack IKE Phase 1 Negotiation

CAC protection
-In Negotiation limit
-SA limit

# show crypto call admission statistics
(config)# crypto call admission limit ike sa 2
(config)# crypto call admission limit ike in-negotiation-sa 10


R1
int tunnel 0
tunnel source gi1/0
tunnel destination mode gre multipoint
tunnel key HRT //should be the same
ip nhrp network-id 1 //should be the same
ip nhrp authentication cisco123 //should be the same
ip nhrp map multicast dynamic
ip nhrp shortcut //phase 3
ip nhrp redirect //phase 3 – we write it in the server
ip address 172.16.0.1 255.255.255.0
tunnel path-mtu-discovery
ip tcp adjust-mss 1360

R2
int tunnel 0
tunnel mode gre multipoint
tunnel source gi 1/0
tunnel key HRT
ip nhrp network-id 1
ip nhrp authentication cisco123
ip nhrp shortcut
ip nhrp nhs 172.16.0.1
ip nhrp map 172.16.0.1 15.0.0.1 //Gre interface then IP interface
ip nhrp map multicast 15.0.0.1
ip address 172.16.0.2 255.255.255.0
ip tcp adjust-mss 1360

R3
int tunnel 0
tunnel mode gre multipoint
tunnel source gi 1/0
tunnel key HRT
ip nhrp network-id 1
ip nhrp authentication cisco123
ip nhrp shortcut
ip nhrp nhs 172.16.0.1
ip nhrp map 172.16.0.1 15.0.0.1 //Gre interface then IP interface
ip nhrp map multicast 15.0.0.1
ip address 172.16.0.3 255.255.255.0
ip tcp adjust-mss 1360


Configuring  IPSEC on Each router

R1
————————-
(config)# crypto isakmp policy 5
(config-isakmp)# hash sha
(config-isakmp)# authentication pre-share
(config-isakmp)# group 14
(config-isakmp)# lifetime 86400
(config-isakmp)# encryption aes 256

(config)#crypto isakmp key cisco123 address …..(your device)
(config)#crypto ipsec transform-set OUTSET esp-aes 256 esp-sha-hmac
(cfg-crypto-trans)# mode transport

(config)#crypto ipsec profile OUR_IPSEC_PROFILE
(ipsec-profile)# set transform-set OURSET

(config)#int tunnel 0
(config-if)# tunnel protection ipsec profile OUR_IPSEC_PROFILE

show dmvpn
show crypto isakmp sa detail
show dmvpn peer nbma …..(IP Peer) detail

Troubleshooting

show run int tunnel 0
debug crypto isakmp // debug phase 1
show crypto isakmp policy
show crypto isakmp key
show crypto engine connections active
show dmvpn detail