DMVPN IKE Call Admission Control
– To mitigate attack IKE Phase 1 Negotiation

CAC protection
-In Negotiation limit
-SA limit

# show crypto call admission statistics
(config)# crypto call admission limit ike sa 2
(config)# crypto call admission limit ike in-negotiation-sa 10


R1
int tunnel 0
tunnel source gi1/0
tunnel destination mode gre multipoint
tunnel key HRT //should be the same
ip nhrp network-id 1 //should be the same
ip nhrp authentication cisco123 //should be the same
ip nhrp map multicast dynamic
ip nhrp shortcut //phase 3
ip nhrp redirect //phase 3 – we write it in the server
ip address 172.16.0.1 255.255.255.0
tunnel path-mtu-discovery
ip tcp adjust-mss 1360

R2
int tunnel 0
tunnel mode gre multipoint
tunnel source gi 1/0
tunnel key HRT
ip nhrp network-id 1
ip nhrp authentication cisco123
ip nhrp shortcut
ip nhrp nhs 172.16.0.1
ip nhrp map 172.16.0.1 15.0.0.1 //Gre interface then IP interface
ip nhrp map multicast 15.0.0.1
ip address 172.16.0.2 255.255.255.0
ip tcp adjust-mss 1360

R3
int tunnel 0
tunnel mode gre multipoint
tunnel source gi 1/0
tunnel key HRT
ip nhrp network-id 1
ip nhrp authentication cisco123
ip nhrp shortcut
ip nhrp nhs 172.16.0.1
ip nhrp map 172.16.0.1 15.0.0.1 //Gre interface then IP interface
ip nhrp map multicast 15.0.0.1
ip address 172.16.0.3 255.255.255.0
ip tcp adjust-mss 1360


Configuring  IPSEC on Each router

R1
————————-
(config)# crypto isakmp policy 5
(config-isakmp)# hash sha
(config-isakmp)# authentication pre-share
(config-isakmp)# group 14
(config-isakmp)# lifetime 86400
(config-isakmp)# encryption aes 256

(config)#crypto isakmp key cisco123 address …..(your device)
(config)#crypto ipsec transform-set OUTSET esp-aes 256 esp-sha-hmac
(cfg-crypto-trans)# mode transport

(config)#crypto ipsec profile OUR_IPSEC_PROFILE
(ipsec-profile)# set transform-set OURSET

(config)#int tunnel 0
(config-if)# tunnel protection ipsec profile OUR_IPSEC_PROFILE

show dmvpn
show crypto isakmp sa detail
show dmvpn peer nbma …..(IP Peer) detail

Troubleshooting

show run int tunnel 0
debug crypto isakmp // debug phase 1
show crypto isakmp policy
show crypto isakmp key
show crypto engine connections active
show dmvpn detail

Configure the Network Settings

  1. On the Sourcefire3D login prompt, use these credentials to log in:For version 5.x
    • Username: admin
    • Password: Sourcefire

    For version 6.x and later

    • Username: admin
    • Password: Admin123

    Tip: You will be able to change the default password in the initial setup process in the GUI.

  2. Initial configuration of the network is done with a script. You need to run the script as a root user. In order to switch to the root user, enter the sudo su – command along with the password Sourcefire or Admin123 (for 6.x).  Exercise caution when logged into the Management Center command line as a root user.
    admin@Sourcefire3D:~$ sudo su -
    Password:
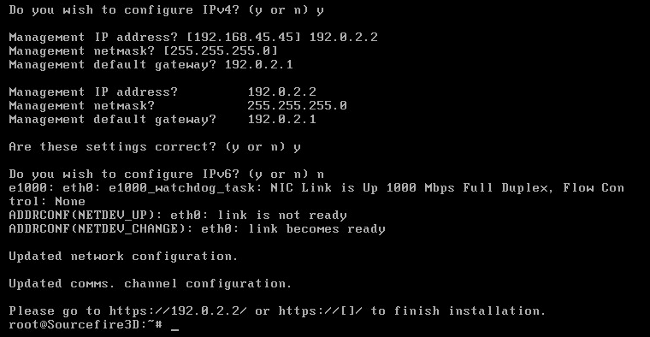
  3. In order to begin the network configuration, enter the configure-network script as root.

    You will be asked to provide a Management IP Address, netmask, and default gateway. Once you confirm the settings, the network service restarts. As a result, the management interface goes  down and then comes back.

Perform Initial Setup

  1. After the network settings are configured, open a web browser and browse to the configured IP via HTTPS (https://192.0.2.2 in this example).  Authenticate the default SSL certificate if prompted. Use these credentials in order to log in:

    For version 5.x

    • Username: admin
    • Password: Sourcefire

    For version 6.x and later

    • Username: admin
    • Password: Admin123
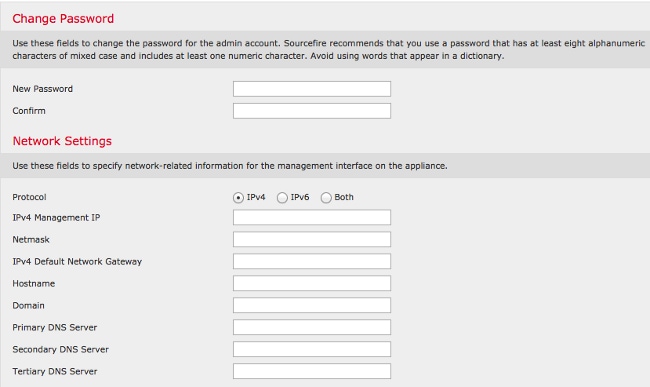
  2. On the screen that follows, all of the GUI configuration sections are optional except for the password change and acceptance of the terms of service.  If the information is known, it is recommended to use the setup wizard in order to simplify the initial configuration of the Management Center. Once configured, click Apply in order to apply the configuration to the Management Center and registered devices.  A brief overview of the configuration options is as follows:
    • Change Password:  Allows you to change the password for the default admin account.  It is required to change the password.
    • Network Settings:  Allows you to modify the previously configured IPv4 and IPv6 network settings for the management interface of the appliance or virtual machine.
    • Time Settings:  It is recommended that you sync the Management Center with a reliable NTP source. The IPS sensors can be configured through system policy to synchronize their time with the Management Center.  Optionally, the time and display time zone can be set manually.
    • Recurring Rule Update Imports:  Enable recurring Snort rule updates and optionally install now during the initial setup.
    • Recurring Geolocation Updates:  Enable recurring geolocation rule updates and optionally install now during the initial setup.
    • Automatic Backups:  Schedule automatic configuration backups.
    • License Settings:  Add the feature license.
    • Device Registration:  Allows you to add, license, and apply initial access control policies to preregistered devices.  The hostname/IP address and registration key should match the IP address and registration key configured on the FirePOWER IPS module.
    • End User License Agreement:  Acceptance of the EULA is required.

  • Source : cisco.com

Simply make a batch file in windows and read from your excel file then convert the your datasheet to fortigate rules. In this code, I converted the excel file with 5 columns to the fortigate policy.

My Excel File:

any,any,ctldl.windowsupdate.com,80/443,Test1
any,any,microsoft.com,80,Test2
any,any,crl.microsoft.com,80,Test3
any,any,ssl.google-analytics.com,443,Test4

My Batch file:

@echo off
setlocal ENABLEDELAYEDEXPANSION

>output-configuration-policy.txt (
echo:config firewall policy
set /a Counter=1

for /f “tokens=1-5 delims=,” %%A IN (C:\Users\rules.txt) DO (

echo edit !counter!
echo set name %%E
echo set srcintf vlan910-1135
echo set dstintf vlan1000-1135
echo set srcaddr %%A
echo set dstaddr %%C
echo set action accept
echo set service “HTTPS” “HTTP”
echo set schedule “always”
echo set logtraffic all
set /a counter=!Counter! + 1
echo next

)

:end
echo:end
)

I have added counter to count from 1 to number of your rules.