

This is really good file, if you want to evaluate what is inside bro:

Today we will be looking into how to setup a centralized log management for Linux servers, this will help the Linux admin to have a multiple server logs into one single place. The Linux admin not required to login in to each servers for checking the logs, he can just login into the centralized server and start do the logs monitoring.
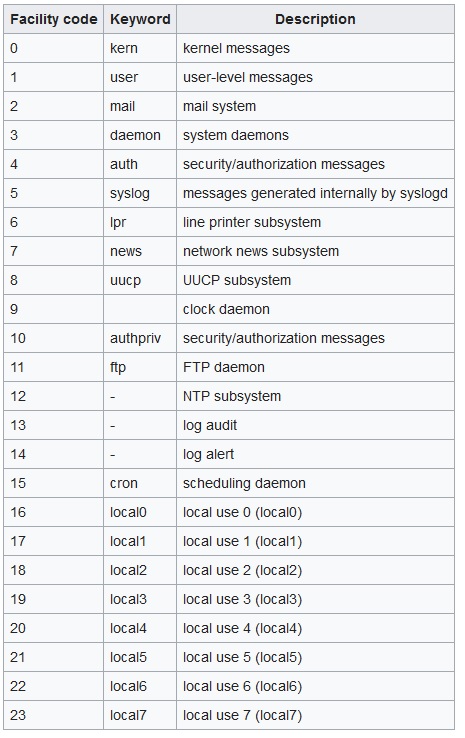
Linux labels (auth, cron, ftp, lpr, authpriv, news, mail, syslog, etc ,..) the log messages to indicate the type of software that generated the messages with severity (Alert, critical, Warning, Notice, info, etc ,..).
You can find more information on Message Labels and Severity Levels
Make sure you have the following to setup log server.
Two Linux servers ( server and client).
server.itzgeek.com 192.168.12.131
client.itzgeek.com 192.168.12.132
Install syslog package, if you do not have it installed.
[root@server ~]# yum -y install rsyslog |
Edit /etc/rsyslog.conf
[root@server ~]# vi /etc/rsyslog.conf |
Un comment the following to enable the syslog server to listen on the tcp and udp port.
From
# Provides UDP syslog reception #$ModLoad imudp #$UDPServerRun 514 # Provides TCP syslog reception #$ModLoad imtcp #$InputTCPServerRun 514 |
To
# Provides UDP syslog reception $ModLoad imudp $UDPServerRun 514 # Provides TCP syslog reception $ModLoad imtcp $InputTCPServerRun 514 |
Restart the syslog service
[root@server ~]# systemctl restart rsyslog.service |
Verify the syslog server listening.
[root@server ~]# netstat -antup | grep 514 tcp 0 0 0.0.0.0:514 0.0.0.0:* LISTEN 759/rsyslogd tcp6 0 0 :::514 :::* LISTEN 759/rsyslogd udp 0 0 0.0.0.0:514 0.0.0.0:* 759/rsyslogd udp6 0 0 :::514 :::* 759/rsyslogd |
Install syslog package, if you do not have it installed. Edit /etc/rsyslog.conf
[root@client ~]# vi /etc/rsyslog.conf |
At the end of file place the following line to point the client message log to the server
*.info;mail.none;authpriv.none;cron.none @192.168.12.131 |
You can either mention @hostname or @ip address.
Restart the syslog service
[root@client ~]# systemctl restart rsyslog.service |
Now all the message logs are sent to the central server and also it keeps the copy locally.
Mostly all the production environment are protected by hardware firewall, ask them to open the TCP & UDP 514.
If you have IP tables enabled, run the following command on server in order to accept incoming traffic on UDP / TCP port 514.
[root@server ~]#firewall-cmd --permanent --zone=public --add-port=514/tcp [root@server ~]#firewall-cmd --permanent --zone=public --add-port=514/udp [root@server ~]#firewall-cmd --reload |
You can verify the port opening by issuing the following command from the client.
[root@client ~]# telnet 192.168.12.131 514 Trying 192.168.12.131... Connected to 192.168.12.131. Escape character is '^]'. |
If it didn’t give any reply, disable firewall on both client and server.
Monitor the activity from the log server, open the message log.
[root@server ~]# tailf /var/log/messages |
I have installed and started vsftpd on client machine, you can see both are recorded in syslog server.
Oct 5 06:03:53 client yum[2425]: Installed: vsftpd-3.0.2-9.el7.x86_64 Oct 5 06:04:13 client systemd: Starting Vsftpd ftp daemon... Oct 5 06:04:13 client systemd: Started Vsftpd ftp daemon. |
By this way you can monitor the other logs such as secure, mail, cron logs etc.
also we have these main categories for syslog’s facility:
source: http://www.itzgeek.com/how-tos/linux/centos-how-tos/setup-syslog-server-on-centos-7-rhel-7.html

Many of Linux distributions already shipped with tcpdump tool, if in case you don’t have it on systems, you can install it using following apt-get command.
# apt-get install tcpdump
Once tcpdump tool is installed on systems, you can continue to browse following commands with their examples.
# tcpdump -i eth0
tcpdump: verbose output suppressed, use -v or -vv for full protocol decode
listening on eth0, link-type EN10MB (Ethernet), capture size 65535 bytes
11:33:31.976358 IP 172.16.25.126.ssh > 172.16.25.125.apwi-rxspooler: Flags [P.], seq 3500440357:3500440553, ack 3652628334, win 18760, length 196
11:33:31.976603 IP 172.16.25.125.apwi-rxspooler > 172.16.25.126.ssh: Flags [.], ack 196, win 64487, length 0
11:33:31.977243 ARP, Request who-has tecmint.com tell 172.16.25.126, length 28
11:33:31.977359 ARP, Reply tecmint.com is-at 00:14:5e:67:26:1d (oui Unknown), length 46
11:33:31.977367 IP 172.16.25.126.54807 > tecmint.com: 4240+ PTR? 125.25.16.172.in-addr.arpa. (44)
11:33:31.977599 IP tecmint.com > 172.16.25.126.54807: 4240 NXDomain 0/1/0 (121)
11:33:31.977742 IP 172.16.25.126.44519 > tecmint.com: 40988+ PTR? 126.25.16.172.in-addr.arpa. (44)
11:33:32.028747 IP 172.16.20.33.netbios-ns > 172.16.31.255.netbios-ns: NBT UDP PACKET(137): QUERY; REQUEST; BROADCAST
11:33:32.112045 IP 172.16.21.153.netbios-ns > 172.16.31.255.netbios-ns: NBT UDP PACKET(137): QUERY; REQUEST; BROADCAST
11:33:32.115606 IP 172.16.21.144.netbios-ns > 172.16.31.255.netbios-ns: NBT UDP PACKET(137): QUERY; REQUEST; BROADCAST
11:33:32.156576 ARP, Request who-has 172.16.16.37 tell old-oraclehp1.midcorp.mid-day.com, length 46
11:33:32.348738 IP tecmint.com > 172.16.25.126.44519: 40988 NXDomain 0/1/0 (121)
When you run tcpdump command it will capture all the packets for specified interface, until you Hit cancel button. But using -c option, you can capture specified number of packets. The below example will only capture 6 packets.
# tcpdump -c 5 -i eth0
tcpdump: verbose output suppressed, use -v or -vv for full protocol decode
listening on eth0, link-type EN10MB (Ethernet), capture size 65535 bytes
11:40:20.281355 IP 172.16.25.126.ssh > 172.16.25.125.apwi-rxspooler: Flags [P.], seq 3500447285:3500447481, ack 3652629474, win 18760, length 196
11:40:20.281586 IP 172.16.25.125.apwi-rxspooler > 172.16.25.126.ssh: Flags [.], ack 196, win 65235, length 0
11:40:20.282244 ARP, Request who-has tecmint.com tell 172.16.25.126, length 28
11:40:20.282360 ARP, Reply tecmint.com is-at 00:14:5e:67:26:1d (oui Unknown), length 46
11:40:20.282369 IP 172.16.25.126.53216 > tecmint.com.domain: 49504+ PTR? 125.25.16.172.in-addr.arpa. (44)
11:40:20.332494 IP tecmint.com.netbios-ssn > 172.16.26.17.nimaux: Flags [P.], seq 3058424861:3058424914, ack 693912021, win 64190, length 53 NBT Session Packet: Session Message
6 packets captured
23 packets received by filter
0 packets dropped by kernel
The below tcpdump command with option -A displays the package in ASCII format. It is a character-encoding scheme format.
# tcpdump -A -i eth0
tcpdump: verbose output suppressed, use -v or -vv for full protocol decode
listening on eth0, link-type EN10MB (Ethernet), capture size 65535 bytes
09:31:31.347508 IP 192.168.0.2.ssh > 192.168.0.1.nokia-ann-ch1: Flags [P.], seq 3329372346:3329372542, ack 4193416789, win 17688, length 196
M.r0...vUP.E.X.......~.%..>N..oFk.........KQ..)Eq.d.,....r^l......m\.oyE....-....g~m..Xy.6..1.....c.O.@...o_..J....i.*.....2f.mQH...Q.c...6....9.v.gb........;..4.).UiCY]..9..x.)..Z.XF....'|..E......M..u.5.......ul
09:31:31.347760 IP 192.168.0.1.nokia-ann-ch1 > 192.168.0.2.ssh: Flags [.], ack 196, win 64351, length 0
M....vU.r1~P.._..........
^C09:31:31.349560 IP 192.168.0.2.46393 > b.resolvers.Level3.net.domain: 11148+ PTR? 1.0.168.192.in-addr.arpa. (42)
E..F..@.@............9.5.2.f+............1.0.168.192.in-addr.arpa.....
3 packets captured
11 packets received by filter
0 packets dropped by kernel
To list number of available interfaces on the system, run the following command with -D option.
# tcpdump -D
1.eth0
2.eth1
3.usbmon1 (USB bus number 1)
4.usbmon2 (USB bus number 2)
5.usbmon3 (USB bus number 3)
6.usbmon4 (USB bus number 4)
7.usbmon5 (USB bus number 5)
8.any (Pseudo-device that captures on all interfaces)
9.lo
The following command with option -XX capture the data of each packet, including its link level header in HEX and ASCII format.
# tcpdump -XX -i eth0
11:51:18.974360 IP 172.16.25.126.ssh > 172.16.25.125.apwi-rxspooler: Flags [P.], seq 3509235537:3509235733, ack 3652638190, win 18760, length 196
0x0000:  b8ac 6f2e 57b3 0001 6c99 1468 0800 4510  ..o.W...l..h..E.
0x0010:  00ec 8783 4000 4006 275d ac10 197e ac10  ....@.@.']...~..
0x0020:  197d 0016 1129 d12a af51 d9b6 d5ee 5018  .}...).*.Q....P.
0x0030:  4948 8bfa 0000 0e12 ea4d 22d1 67c0 f123  IH.......M".g..#
0x0040:  9013 8f68 aa70 29f3 2efc c512 5660 4fe8  ...h.p).....V`O.
0x0050:  590a d631 f939 dd06 e36a 69ed cac2 95b6  Y..1.9...ji.....
0x0060:  f8ba b42a 344b 8e56 a5c4 b3a2 ed82 c3a1  ...*4K.V........
0x0070:  80c8 7980 11ac 9bd7 5b01 18d5 8180 4536  ..y.....[.....E6
0x0080:  30fd 4f6d 4190 f66f 2e24 e877 ed23 8eb0  0.OmA..o.$.w.#..
0x0090:  5a1d f3ec 4be4 e0fb 8553 7c85 17d9 866f  Z...K....S|....o
0x00a0:  c279 0d9c 8f9d 445b 7b01 81eb 1b63 7f12  .y....D[{....c..
0x00b0:  71b3 1357 52c7 cf00 95c6 c9f6 63b1 ca51  q..WR.......c..Q
0x00c0:  0ac6 456e 0620 38e6 10cb 6139 fb2a a756  ..En..8...a9.*.V
0x00d0:  37d6 c5f3 f5f3 d8e8 3316 d14f d7ab fd93  7.......3..O....
0x00e0:  1137 61c1 6a5c b4d1 ddda 380a f782 d983  .7a.j\....8.....
0x00f0:  62ff a5a9 bb39 4f80 668a                 b....9O.f.
11:51:18.974759 IP 172.16.25.126.60952 > mddc-01.midcorp.mid-day.com.domain: 14620+ PTR? 125.25.16.172.in-addr.arpa. (44)
0x0000:  0014 5e67 261d 0001 6c99 1468 0800 4500  ..^g&...l..h..E.
0x0010:  0048 5a83 4000 4011 5e25 ac10 197e ac10  .HZ.@.@.^%...~..
0x0020:  105e ee18 0035 0034 8242 391c 0100 0001  .^...5.4.B9.....
0x0030:  0000 0000 0000 0331 3235 0232 3502 3136  .......125.25.16
0x0040:  0331 3732 0769 6e2d 6164 6472 0461 7270  .172.in-addr.arp
0x0050:  6100 000c 0001                           a.....
As we said, that tcpdump has a feature to capture and save the file in a .pcap format, to do this just execute command with -w option.
# tcpdump -w 0001.pcap -i eth0
tcpdump: listening on eth0, link-type EN10MB (Ethernet), capture size 65535 bytes
4 packets captured
4 packets received by filter
0 packets dropped by kernel
To read and analyze captured packet 0001.pcap file use the command with -r option, as shown below.
# tcpdump -r 0001.pcap
reading from file 0001.pcap, link-type EN10MB (Ethernet)
09:59:34.839117 IP 192.168.0.2.ssh > 192.168.0.1.nokia-ann-ch1: Flags [P.], seq 3353041614:3353041746, ack 4193563273, win 18760, length 132
09:59:34.963022 IP 192.168.0.1.nokia-ann-ch1 > 192.168.0.2.ssh: Flags [.], ack 132, win 65351, length 0
09:59:36.935309 IP 192.168.0.1.netbios-dgm > 192.168.0.255.netbios-dgm: NBT UDP PACKET(138)
09:59:37.528731 IP 192.168.0.1.nokia-ann-ch1 > 192.168.0.2.ssh: Flags [P.], seq 1:53, ack 132, win 65351, length 5
To capture packets for a specific interface, run the following command with option -n.
# tcpdump -n -i eth0
tcpdump: verbose output suppressed, use -v or -vv for full protocol decode
listening on eth0, link-type EN10MB (Ethernet), capture size 65535 bytes
12:07:03.952358 IP 172.16.25.126.ssh > 172.16.25.125.apwi-rxspooler: Flags [P.], seq 3509512873:3509513069, ack 3652639034, win 18760, length 196
12:07:03.952602 IP 172.16.25.125.apwi-rxspooler > 172.16.25.126.ssh: Flags [.], ack 196, win 64171, length 0
12:07:03.953311 IP 172.16.25.126.ssh > 172.16.25.125.apwi-rxspooler: Flags [P.], seq 196:504, ack 1, win 18760, length 308
12:07:03.954288 IP 172.16.25.126.ssh > 172.16.25.125.apwi-rxspooler: Flags [P.], seq 504:668, ack 1, win 18760, length 164
12:07:03.954502 IP 172.16.25.125.apwi-rxspooler > 172.16.25.126.ssh: Flags [.], ack 668, win 65535, length 0
12:07:03.955298 IP 172.16.25.126.ssh > 172.16.25.125.apwi-rxspooler: Flags [P.], seq 668:944, ack 1, win 18760, length 276
12:07:03.955425 IP 172.16.23.16.netbios-ns > 172.16.31.255.netbios-ns: NBT UDP PACKET(137): REGISTRATION; REQUEST; BROADCAST
12:07:03.956299 IP 172.16.25.126.ssh > 172.16.25.125.apwi-rxspooler: Flags [P.], seq 944:1236, ack 1, win 18760, length 292
12:07:03.956535 IP 172.16.25.125.apwi-rxspooler > 172.16.25.126.ssh: Flags [.], ack 1236, win 64967, length 0
To capture packets based on TCP port, run the following command with option tcp.
# tcpdump -i eth0 tcp
tcpdump: verbose output suppressed, use -v or -vv for full protocol decode
listening on eth0, link-type EN10MB (Ethernet), capture size 65535 bytes
12:10:36.216358 IP 172.16.25.126.ssh > 172.16.25.125.apwi-rxspooler: Flags [P.], seq 3509646029:3509646225, ack 3652640142, win 18760, length 196
12:10:36.216592 IP 172.16.25.125.apwi-rxspooler > 172.16.25.126.ssh: Flags [.], ack 196, win 64687, length 0
12:10:36.219069 IP 172.16.25.126.ssh > 172.16.25.125.apwi-rxspooler: Flags [P.], seq 196:504, ack 1, win 18760, length 308
12:10:36.220039 IP 172.16.25.126.ssh > 172.16.25.125.apwi-rxspooler: Flags [P.], seq 504:668, ack 1, win 18760, length 164
12:10:36.220260 IP 172.16.25.125.apwi-rxspooler > 172.16.25.126.ssh: Flags [.], ack 668, win 64215, length 0
12:10:36.222045 IP 172.16.25.126.ssh > 172.16.25.125.apwi-rxspooler: Flags [P.], seq 668:944, ack 1, win 18760, length 276
12:10:36.223036 IP 172.16.25.126.ssh > 172.16.25.125.apwi-rxspooler: Flags [P.], seq 944:1108, ack 1, win 18760, length 164
12:10:36.223252 IP 172.16.25.125.apwi-rxspooler > 172.16.25.126.ssh: Flags [.], ack 1108, win 65535, length 0
^C12:10:36.223461 IP mid-pay.midcorp.mid-day.com.netbios-ssn > 172.16.22.183.recipe: Flags [.], seq 283256512:283256513, ack 550465221, win 65531, length 1[|SMB]
Let’s say you want to capture packets for specific port 22, execute the below command by specifying port number 22 as shown below.
# tcpdump -i eth0 port 22
tcpdump: verbose output suppressed, use -v or -vv for full protocol decode
listening on eth0, link-type EN10MB (Ethernet), capture size 65535 bytes
10:37:49.056927 IP 192.168.0.2.ssh > 192.168.0.1.nokia-ann-ch1: Flags [P.], seq 3364204694:3364204890, ack 4193655445, win 20904, length 196
10:37:49.196436 IP 192.168.0.2.ssh > 192.168.0.1.nokia-ann-ch1: Flags [P.], seq 4294967244:196, ack 1, win 20904, length 248
10:37:49.196615 IP 192.168.0.1.nokia-ann-ch1 > 192.168.0.2.ssh: Flags [.], ack 196, win 64491, length 0
10:37:49.379298 IP 192.168.0.2.ssh > 192.168.0.1.nokia-ann-ch1: Flags [P.], seq 196:616, ack 1, win 20904, length 420
10:37:49.381080 IP 192.168.0.2.ssh > 192.168.0.1.nokia-ann-ch1: Flags [P.], seq 616:780, ack 1, win 20904, length 164
10:37:49.381322 IP 192.168.0.1.nokia-ann-ch1 > 192.168.0.2.ssh: Flags [.], ack 780, win 65535, length 0
To capture packets from source IP, say you want to capture packets for 192.168.0.2, use the command as follows.
# tcpdump -i eth0 src 192.168.0.2
tcpdump: verbose output suppressed, use -v or -vv for full protocol decode
listening on eth0, link-type EN10MB (Ethernet), capture size 65535 bytes
10:49:15.746474 IP 192.168.0.2.ssh > 192.168.0.1.nokia-ann-ch1: Flags [P.], seq 3364578842:3364579038, ack 4193668445, win 20904, length 196
10:49:15.748554 IP 192.168.0.2.56200 > b.resolvers.Level3.net.domain: 11289+ PTR? 1.0.168.192.in-addr.arpa. (42)
10:49:15.912165 IP 192.168.0.2.56234 > b.resolvers.Level3.net.domain: 53106+ PTR? 2.0.168.192.in-addr.arpa. (42)
10:49:16.074720 IP 192.168.0.2.33961 > b.resolvers.Level3.net.domain: 38447+ PTR? 2.2.2.4.in-addr.arpa. (38)
To capture packets from destination IP, say you want to capture packets for 50.116.66.139, use the command as follows.
# tcpdump -i eth0 dst 50.116.66.139
tcpdump: verbose output suppressed, use -v or -vv for full protocol decode
listening on eth0, link-type EN10MB (Ethernet), capture size 65535 bytes
10:55:01.798591 IP 192.168.0.2.59896 > 50.116.66.139.http: Flags [.], ack 2480401451, win 318, options [nop,nop,TS val 7955710 ecr 804759402], length 0
10:55:05.527476 IP 192.168.0.2.59894 > 50.116.66.139.http: Flags [F.], seq 2521556029, ack 2164168606, win 245, options [nop,nop,TS val 7959439 ecr 804759284], length 0
10:55:05.626027 IP 192.168.0.2.59894 > 50.116.66.139.http: Flags [.], ack 2, win 245, options [nop,nop,TS val 7959537 ecr 804759787], length 0
source :https://www.tecmint.com/
I have found an articles about Honeypot and SCADA. I think it is worth looking at this article.
sudo apt-get install openssh-server
————– Define a group —————————
sudo group add sftponly
cat /etc/group
———— Add User to Group————————-
useradd hamid -d / -g [group number] -M -N -o -u [group number]
sudo passwd hamid
———–Backup sshd_config file———————-
sudo cp /etc/ssh/sshd_config /etc/ssh/sshd_config.bak
sudo nano +76 /etc/ssh/sshd_config
——————–Edit in sshd_config file—————
Subsystem sftp internal-sftp
Match User sammyfiles
ForceCommand internal-sftp
PasswordAuthentication yes
ChrootDirectory /var/www
PermitTunnel no
AllowAgentForwarding no
AllowTcpForwarding no
X11Forwarding no
——————————————————————-
sudo systemctl restart sshd
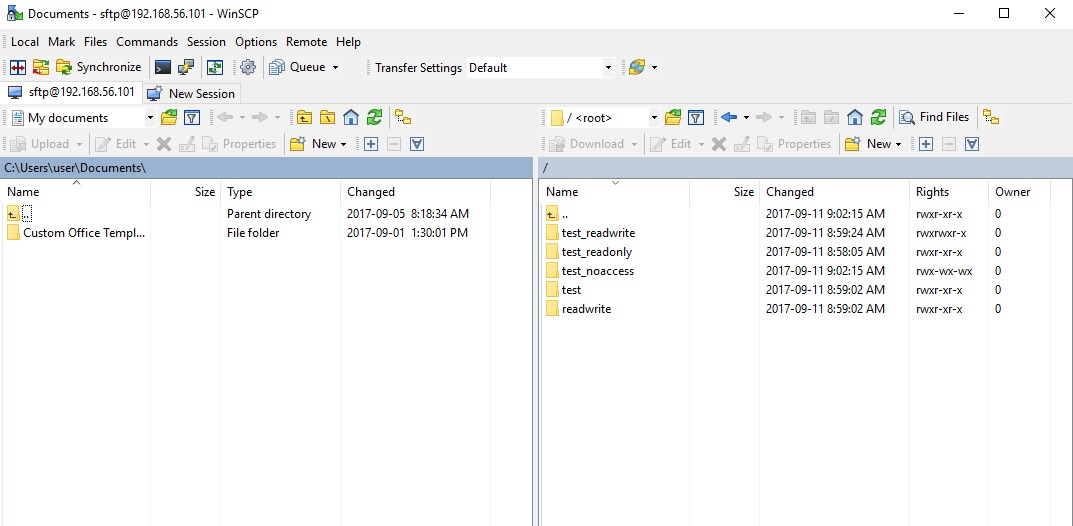
root@hrt-VirtualBox:~# mkdir /var/www
root@hrt-VirtualBox:~# cd /var/www
root@hrt-VirtualBox:/var/www# mkdir test_readonly
root@hrt-VirtualBox:/var/www# chmod 755 test_readonly
root@hrt-VirtualBox:/var/www# mkdir test readwrite
root@hrt-VirtualBox:/var/www# mkdir test_readwrite
root@hrt-VirtualBox:/var/www# chown root:sftponly test_readwrite
root@hrt-VirtualBox:/var/www# chmod 775 test_readwrite
root@hrt-VirtualBox:/var/www# mkdir test_noaccess
root@hrt-VirtualBox:/var/www# chmod 733 test_noaccess
you can use SCP or Putty to connect to server in windows
You can set schedule in linux with this command:
$ crontab -e
for example:
We want our job to run at 5 A.M., which would be minute 0, hour 5, every day of the month, every month, every day of the week. We need to add a line to the bottom of the file which looks like this:
0 5 * * * /home/myname/scripts/do-every-day.sh
for backup everyday at 12:02 AM
2 0 * * * tar -zcf /home/hrt/Desktop/backup/$(date +\%H-\%M-\%S-\%d-\%m-\%Y).tar.gz /usr/local/bro/logs>/dev/null 2>&1
for fixing bug in ubuntu you have to add >/dev/null 2>&1 to every crontab you define.
For checking your crontab, use this command:
$crontab -l
For removing crontab just add this one:
$crontab -r
For viewing logs run this command:
sudo grep -i cron /var/log/syslog

Still wondering which file transfer protocol is right for your business? Here’s a dozen you can choose from. We’ve also added some brief descriptions to make your choice easier.

When it comes to business file transfers, FTP is probably the first that comes to mind. FTP is built for both single file and bulk file transfers. It’s been around for quite some time, so you likely won’t have problems with interoperability. Meaning, there’ll always be a good chance your trading partner will be able to exchange information through it. You won’t have trouble finding a client application for your end users either.
The downside is, this file transfer protocol is not so strong on security. Hence, if you need to comply with data security/privacy laws and regulations like HIPAA, PCI-DSS, SOX, GLBA, and EU Data Protection Directive, stay away from it. Choose FTP if your business is NOT or does NOT:
Another problem with FTP is its susceptibility to firewall issues, which can adversely affect client connectivity. Read Active v.s. Passive FTP Simplified to understand the problem and learn how to resolve it.
Like FTP, HTTP is a widely used protocol. It’s easy to implement, especially for person-to-server and person-to-person file transfers (read Exploring Use Cases for Managed File Transfer for reference). Users only need a Web browser like Chrome, Firefox, Internet Explorer, or Safari, and they’ll be ready to go. No installation needed on the client side.
HTTP is also less prone to firewall issues (unlike FTP). However, like FTP, HTTP by itself is inherently insecure and incapable of meeting regulatory compliance or securing data. Use HTTP if (lack of) security is not an issue for you.
Recommended post: How to Set Up a Web File Transfer
The good news is that both FTP and HTTP now have secure versions. FTP has FTPS, while HTTP has HTTPS. Both are protected through SSL. If you use FTPS, you retain the benefits of FTP but gain the security features that come with SSL, including data-in-motion encryption as well as server and client authentication. Because FTPS is based on FTP, you’ll still be subjected to the same firewall issues that come with FTP.
Organizations in the Legal, Government, and Financial Services industry might want to consider FTPS as an option.
Recommended post: Securing Trading Partner File Transfers w/ Auto PGP Encryption & FTPS
As mentioned earlier, HTTPS is the secure version of HTTP. If you don’t like having to install client applications for your end users and most of your end users are non-technical folks, this might be the perfect choice. It’s secure and very user-friendly compared to FTP/S.
Recommended post: How To Set Up A HTTPS File Transfer
Here’s another widely used file transfer protocol that’s perfect for businesses who require privacy/security capabilities. SFTP runs on SSH, a secure protocol that – like SSL – supports data-in-motion encryption and client/server authentication. The main advantage of SFTP over FTPS (which is usually compared to it) is that it’s more firewall-friendly.
Recommended post: Business Benefits Of An SFTP Server
This is an older, more primitive version of SFTP. It also runs on SSH, so it comes with the same security features. However, if you’re using a recent version of SSH, you’ll already have access to both SCP and SFTP. Since SFTP has more functionality, I would recommend it over SCP. The only instance you’ll probably need SCP is if you’ll be exchanging files with a company who only has a legacy SSH server.
Recommended post: Various Linux SCP Examples To Get You Started With Using Secure Copy
Most of the file transfer protocols we’ve discussed so far are primarily used for file transfers. Here’s one that can do more than just facilitate file transfers. WebDAV, which actually runs over HTTP, is mainly designed for collaboration activities. Through WebDAV, users won’t just be able to exchange files. They’ll also be able to collaborate over a single file even if they’re (the users) working from different locations. WebDAV is probably best suited for organizations who need distributed authoring capabilities, e.g. universities and research institutions.
By now, you should be able to guess what the S stands for. That’s right WebDAVS is a secure version of WebDAV. If WebDAV runs over HTTP, WebDAVS runs over HTTPS. That means, it exhibits the same characteristics of WebDAV, plus the secure features of SSL.
This file transfer protocol is different from the rest in that you won’t be using it for exchanging documents, images, or spreadsheets. In fact, you nornally won’t be using this for exchanging files with machines outside of your network. TFTP is better suited for network management tasks like network booting, backing up configuration files, and installing operating systems over a network. Why did we include it here? Well, it is a file transfer protocol and you certainly can use it in your business (albeit internally).
If you want to learn more about TFTP, the article What Is TFTP? would be a good place to start.
Although nearly all of the protocols discussed earlier are capable of supporting B2B exchanges, there are a few protocols that are really designed specifically for such tasks. One of them is AS2.
AS2 is built for EDI (Electronic Data Interchange) transactions, the automated information exchanges normally seen in the manufacturing and retail industries. EDI is now also used in healthcare, as a result of the HIPAA legislation (read Securing HIPAA EDI Transactions with AS2). If you operate in these industries or need to carry out EDI transactions, AS2 is an excellent choice.
Recommended post: You Know It’s Time To Implement Server To Server File Transfer When..
Another file transfer protocol specifically designed for EDI is OFTP. OFTP is quite common in Europe, so if you transact with companies there, you might need this. Both OFTP and AS2 are inherently secure and even support electronic delivery receipts (read What Is An AS2 MDN?), making them perfect for B2B transactions.
WAN file transfers, especially those carried out over great distances, are easily affected by poor network conditions like latency and packet loss, which result in considerably degraded throughputs. AFTP is a TCP-UDP hybrid that makes file transfers virtually immune to these network conditions. If you want to see the big difference AFTP makes, read the post Accelerated File Transfer In Action.
For a detailed explanation on the effects of latency and packet loss and how AFTP makes them virtually negligible, download the white paper How to Boost File Transfer Speeds 100x Without Increasing Your Bandwidth.
Companies in the Film and Manufacturing industries would find this protocol very useful.
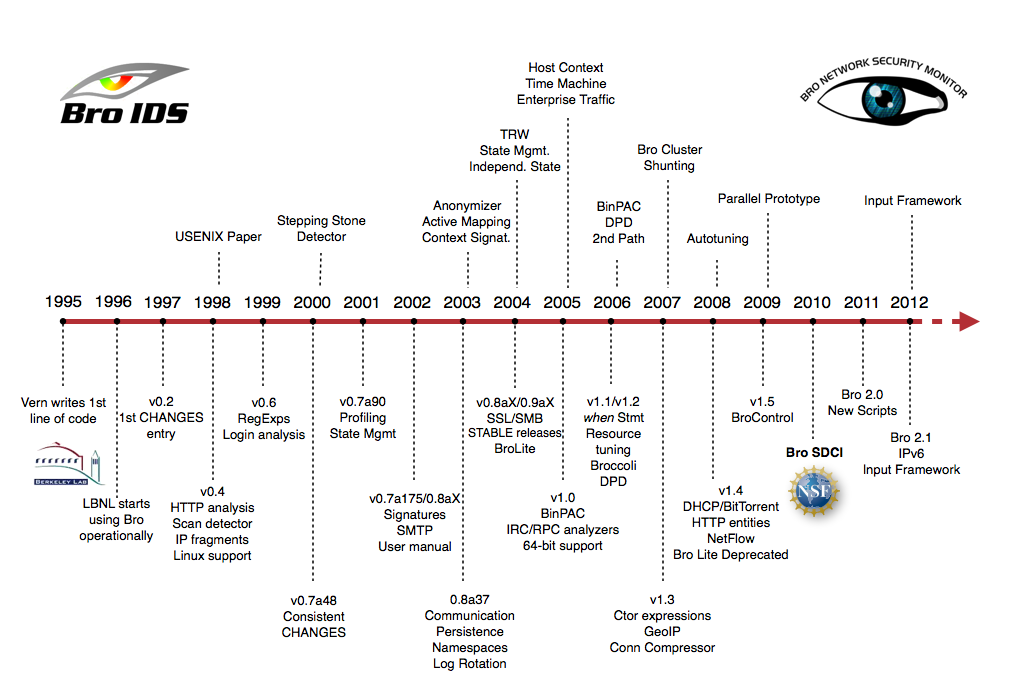
Much of Bro’s capabilities originate in academic research projects, with results often published at top-tier conferences. Bro supports a wide range of analyses through its scripting language. Yet even without further customization it comes with a powerful set of features.
Feature
- Runs on commodity hardware on standard UNIX-style systems (including Linux, FreeBSD, and MacOS).
- Fully passive traffic analysis off a network tap or monitoring port.
- Standard libpcap interface for capturing packets.
- Real-time and offline analysis.
- Cluster-support for large-scale deployments.
- Unified management framework for operating both standalone and cluster setups.
- Open-source under a BSD license.
- Support for many application-layer protocols (including DNS, FTP, HTTP, IRC, SMTP, SSH, SSL).
- Default output to well-structured ASCII logs.
- Real-time integration of external input into analyses. Live database input in preparation.
- External C library for exchanging Bro events with external programs. Comes with Perl, Python, and Ruby bindings.
1- sudo apt-get install cmake make gcc g++ flex bison libpcap-dev libssl-dev python-dev swig zlib1g-dev
2- download from https://www.bro.org/download/index.html and extract it in VM machine.OR git clone –recursive git://git.bro.org/bro
3- just like picture configure it
./configure

4- Then type : make
5- Then type : sudo make install
6- Copy path to Bro install folder :
nano ~/.bashrc
add this line in the end of file
export PATH=/usr/local/bro/bin:$PATH
7-Config your node interface .
sudo nano /usr/local/bro/etc/node.cfg
[bro]
type=standalone
host=localhost
interface=eth0
*Note: You can define two or more network here. The name [bro] can be change for yourself as an option.
8-Now change the directory and go to Desktop and make your user super user with sudo -s . Then type broctl
9- in [BrotControl] start for starting bro | stop for stopping bro | nodes show number of nodes | status shows the name of node and bro
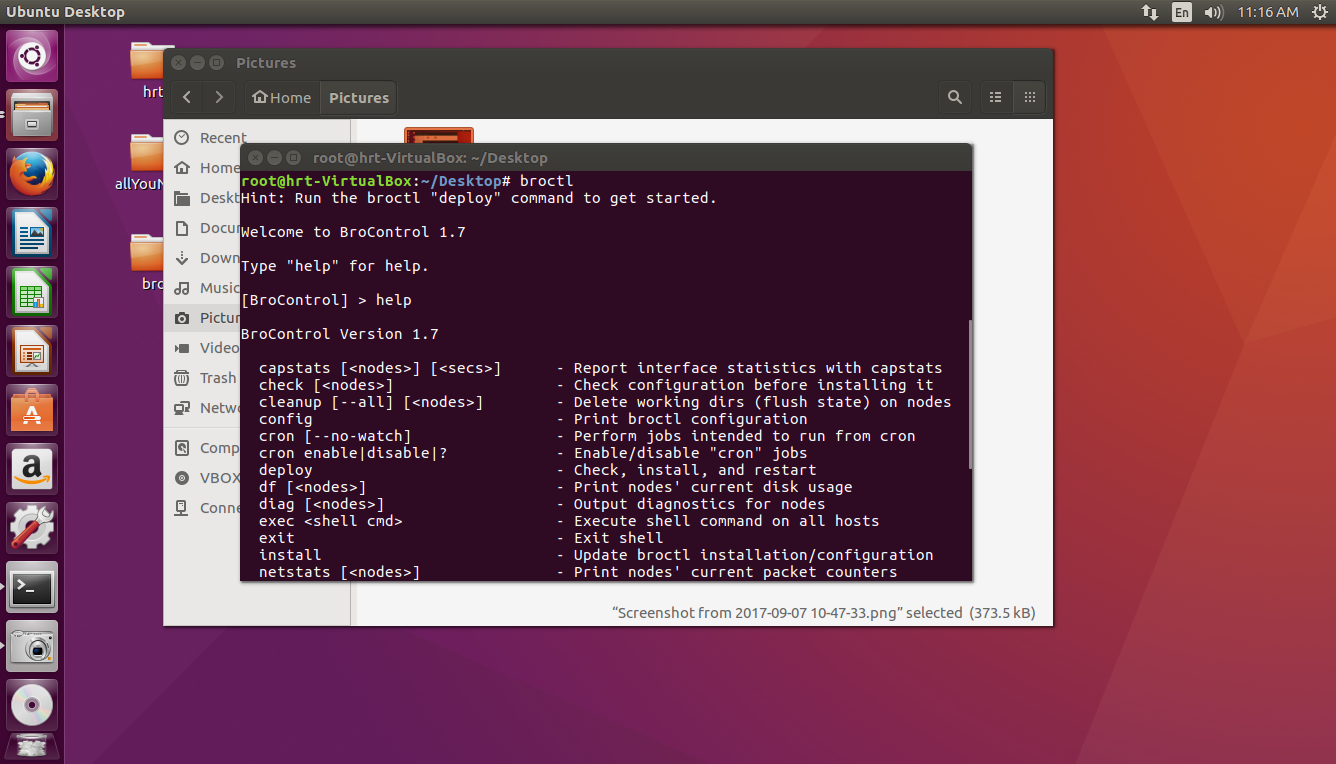
* for Starting service always in [BroControl] first install then type start
Go to this link for more information:
https://www.bro.org/sphinx/components/broctl/README.html
Log files by default is located in this path:
/usr/local/bro/logs/
with zcat command you can read logs but there are also some techniques you can boost your report. follow this link:
useful links for installing on server:
https://www.digitalocean.com/community/tutorials/how-to-install-bro-on-ubuntu-16-04
tty= teletypewriter
Ctrl+Alt + F1 =tty1
Ctrl+Alt + F2 =tty2
.
.
Ctrl+Alt+F7= graphic
Description of Command
$apropos file
See manual
$ man file
where we are?
$ which ls
what is in root
$ ls /
show files in list
$ls -l
show the content of directory
$ls -lR
. current directory
.. parent directory
~ user’s home folder
Editors
nano , vim ,vi
$ nano FileName
$ vi FileName
exit : escape :q
To create file
$ touch filename
To see inside file
$ cat filename
To copy
$ cp sourceDirectory Destination
$ cp myfile2 myfile3 Documents // copy to two destinations
To remove file
$ rm myfile
Give list of the files starts with a
$ ls a*
give list of the files starts with three character
$ls ???
link files together
ln users.txt Document/list.txt
find a file larger than 10M
$ find +size +10M
write some text in file
$echo “more information” > output.txt
$ ls > homedir.txt
Use Pipe
$ cat homedir.txt | wc
// count file text
compare files
$diff -y text1.txt text2.txt
$ diff -u text1.txt text2.txt
compare binaries files
$ cmp text1.txt text2.txt
Archives and Compression
$tar -cf doc.tar listoffiles
$tar -tf doc.tar //read
$tar -xf doc.tar extractdistination
Zip file1 file2 …
unzip myfiles.zip -d unzip //create foldername unzip to extract
Find with grep
$ cat users.txt | grep -E “[A-M][m-z]”
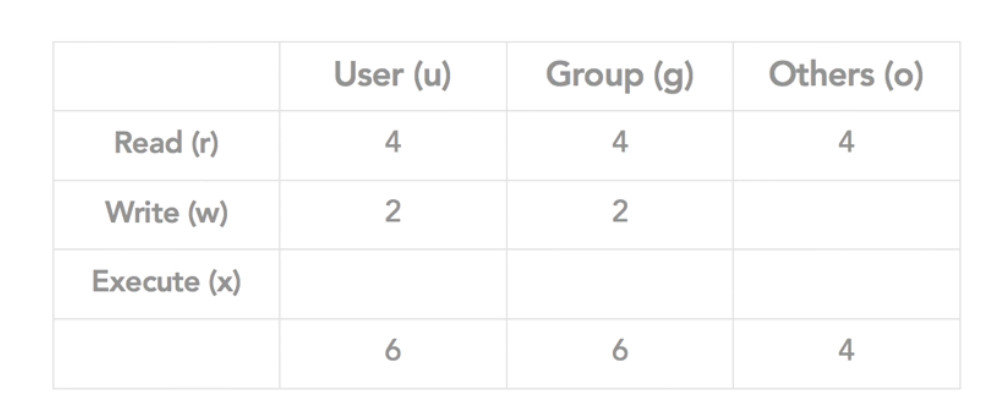
change permission
$ chmod 600 myfile
$ chmod ugo+rwx myfile

change currnet user to root user
$sudo -s
#
SSH
$sudo apt install openssh-server
to connect from another system: ssh user@ip
SFTP
$ get file3
$ put file3
SCP
Secure Copy Protocol
remote component user@host:path-to-file
$scp file4 hrt@192.168.3.10:/Documents
Packages update
sudo apt-get update
sudo apt-get upgrade
Enable Firewall
ufw enable
ufw allow 22/tcp
Disable Firewall
ufw disable
dd if=source of=destination // copy large – cloning
ps //show process
ps aux | grep “evol”
ifconfig
apt-get install ….
ip address add 192.168.99.37/24 dev eth0