Introduction
When running a website, there are often parts of the site that you’ll want to restrict from visitors. Web applications may provide their own authentication and authorization methods, but the web server itself can also be used to restrict access if these are inadequate or unavailable.
In this guide, we’ll demonstrate how to password-protect assets on an Apache web server running on Ubuntu 16.04.
Prerequisites
In order to complete this tutorial, you will need access to an Ubuntu 16.04 server.
In addition, you will need the following before you can begin:
- A
sudo user on your server: You can create a user with sudo privileges by following the Ubuntu 16.04 initial server setup guide.
- An Apache2 web server: If you haven’t already set one up, the Apache section of the in-depth article, How To Install Linux, Apache, MySQL, PHP (LAMP) stack on Ubuntu 16.04
, can guide you.
- A site secured with SSL: How you set that up depends on whether you have a domain name for your site.
- If you have a domain name… the easiest way to secure your site is with Let’s Encrypt, which provides free, trusted certificates. Follow the Let’s Encrypt guide for Apache to set this up.
- If you do not have a domain… and you are just using this configuration for testing or personal use, you can use a self-signed certificate instead. This provides the same type of encryption, but without the domain validation. Follow the self-signed SSL guide for Apache to get set up.
When all of these are in place, log into your server as the sudo user and continue below.
Step 1 — Installing the Apache Utilities Package
We will use a utility called htpasswd, part of the apache2-utils package, to create the file and manage the username and passwords needed to access restricted content.
- sudo apt-get update
- sudo apt-get install apache2-utils
Step 2 — Creating the Password File
We now have access to the htpasswd command. We can use this to create a password file that Apache can use to authenticate users. We will create a hidden file for this purpose called .htpasswd within our /etc/apache2 configuration directory.
The first time we use this utility, we need to add the -c option to create the specified file. We specify a username (sammy in this example) at the end of the command to create a new entry within the file:
- sudo htpasswd -c /etc/apache2/.htpasswd sammy
You will be asked to supply and confirm a password for the user.
Leave out the -c argument for any additional users you wish to add:
- sudo htpasswd /etc/apache2/.htpasswd another_user
If we view the contents of the file, we can see the username and the encrypted password for each record:
- cat /etc/apache2/.htpasswd
Output
sammy:$apr1$.0CAabqX$rb8lueIORA/p8UzGPYtGs/
another_user:$apr1$fqH7UG8a$SrUxurp/Atfq6j7GL/VEC1
Step 3 — Configuring Apache Password Authentication
Now that we have a file with users and passwords in a format that Apache can read, we need to configure Apache to check this file before serving our protected content. We can do this in one of two ways: either directly in a site’s virtual host file or by placing .htaccess files in the directories that need restriction. It’s generally best to use the virtual host file, but if you need to allow non-root users to manage their own access restrictions, check the restrictions into version control alongside the website, or have a web applications using .htaccess files for other purposes already, check out the second option.
Choose the option that best suits your needs.
Option 1: Configuring Access Control within the Virtual Host Definition (Preferred)
The first option is to edit the Apache configuration and add the password protection to the virtual host file. This will generally give better performance because it avoids the expense of reading distributed configuration files. This option requires access to the configuration, which isn’t always available, but when you do have access, it’s recommended.
Begin by opening up the virtual host file that you wish to add a restriction to. For our example, we’ll be using the 000-default.conf file that holds the default virtual host installed through Ubuntu’s apache package:
- sudo nano /etc/apache2/sites-enabled/000-default.conf
Inside, with the comments stripped, the file should look similar to this:
/etc/apache2/sites-enabled/000-default.conf
<VirtualHost *:80>
  ServerAdmin webmaster@localhost
  DocumentRoot /var/www/html
  ErrorLog ${APACHE_LOG_DIR}/error.log
  CustomLog ${APACHE_LOG_DIR}/access.log combined
</VirtualHost>
Authentication is done on a per-directory basis. To set up authentication, you will need to target the directory you wish to restrict with a <Directory ___> block. In our example, we’ll restrict the entire document root, but you can modify this listing to only target a specific directory within the web space:
/etc/apache2/sites-enabled/000-default.conf
<VirtualHost *:80>
  ServerAdmin webmaster@localhost
  DocumentRoot /var/www/html
  ErrorLog ${APACHE_LOG_DIR}/error.log
  CustomLog ${APACHE_LOG_DIR}/access.log combined

  <Directory "/var/www/html">
  </Directory>
</VirtualHost>
Within this directory block, specify that we wish to set up Basic authentication. For the AuthName, choose a realm name that will be displayed to the user when prompting for credentials. Use the AuthUserFile directive to point Apache to the password file we created. Finally, we will require a valid-user to access this resource, which means anyone who can verify their identity with a password will be allowed in:
/etc/apache2/sites-enabled/000-default.conf
<VirtualHost *:80>
  ServerAdmin webmaster@localhost
  DocumentRoot /var/www/html
  ErrorLog ${APACHE_LOG_DIR}/error.log
  CustomLog ${APACHE_LOG_DIR}/access.log combined

  <Directory "/var/www/html">
      AuthType Basic
      AuthName "Restricted Content"
      AuthUserFile /etc/apache2/.htpasswd
      Require valid-user
  </Directory>
</VirtualHost>
Save and close the file when you are finished.
Before restarting the web server, you can check the configuration with the following command:
- sudo apache2ctl configtest
If everything checks out and you get Syntax OK, then restart the server to implement your password policy. Since systemctl doesn’t display the outcome of all service management commands, we’ll use the the status to be sure the server is running:
- sudo systemctl restart apache2
- sudo systemctl status apache2
Now, the directory you specified should now be password protected.
Option 2: Configuring Access Control with .htaccess Files
Apache can use .htaccess files in order to allow certain configuration items to be set within a content directory. Since Apache has to re-read these files on every request that involves the directory, which can negatively impact performance, Option 1 is preferred, but if you are already using .htaccess file or need to allow non-root users to manage restrictions, .htaccess files make sense.
To enable password protection using .htaccess files, open the main Apache configuration file:
- sudo nano /etc/apache2/apache2.conf
Find the <Directory> block for the /var/www directory that holds the document root. Turn on .htaccess processing by changing the AllowOverride directive within that block from “None” to “All”:
/etc/apache2/apache2.conf
. . .

<Directory /var/www/>
  Options Indexes FollowSymLinks
  AllowOverride All
  Require all granted
</Directory>

. . .
Save and close the file when you are finished.
Next, we need to add an .htaccess file to the directory we wish to restrict. In our demonstration, we’ll restrict the entire document root (the entire website) which is based at /var/www/html, but you can place this file in any directory where you wish to restrict access:
- sudo nano /var/www/html/.htaccess
Within this file, specify that we wish to set up Basic authentication. For the AuthName, choose a realm name that will be displayed to the user when prompting for credentials. Use the AuthUserFile directive to point Apache to the password file we created. Finally, we will require a valid-user to access this resource, which means anyone who can verify their identity with a password will be allowed in:
/var/www/html/.htaccess
AuthType Basic
AuthName "Restricted Content"
AuthUserFile /etc/apache2/.htpasswd
Require valid-user
Save and close the file. Restart the web server to password protect all content in or below the directory with the .htaccess file and use systemctl status to verify the success of the restart:
- sudo systemctl restart apache2
- sudo systemctl status apache2
Step 4 — Confirming Password Authentication
To confirm that your content is protected, try to access your restricted content in a web browser. You should be presented with a username and password prompt that looks like this:
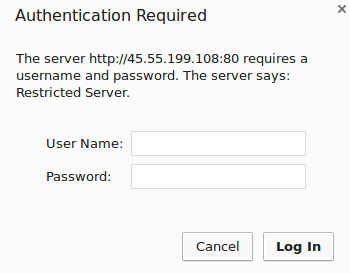
If you enter the correct credentials, you will be allowed to access the content. If you enter the wrong credentials or hit “Cancel”, you will see the “Unauthorized” error page:

Conclusion
Congratulations! If you’ve followed along, you’ve now set up basic authentication for your site. Apache configuration and .htaccess can do much more than basic authentication, however. To find out more about the flexibility and power available in Apache configuration, try one of these tutorials: