Hamidreza Talebi, linux

sudo apt-get install openssh-server

————– Define a group —————————
sudo group add sftponly
cat /etc/group

———— Add User to Group————————-
useradd hamid -d / -g [group number] -M -N -o -u [group number]
sudo passwd hamid

———–Backup sshd_config file———————-

sudo cp /etc/ssh/sshd_config /etc/ssh/sshd_config.bak
sudo nano +76 /etc/ssh/sshd_config

——————–Edit in sshd_config file—————

Subsystem sftp internal-sftp

Match User sammyfiles
ForceCommand internal-sftp
PasswordAuthentication yes
ChrootDirectory /var/www
PermitTunnel no
AllowAgentForwarding no
AllowTcpForwarding no
X11Forwarding no

——————————————————————-
sudo systemctl restart sshd

root@hrt-VirtualBox:~# mkdir /var/www
root@hrt-VirtualBox:~# cd /var/www
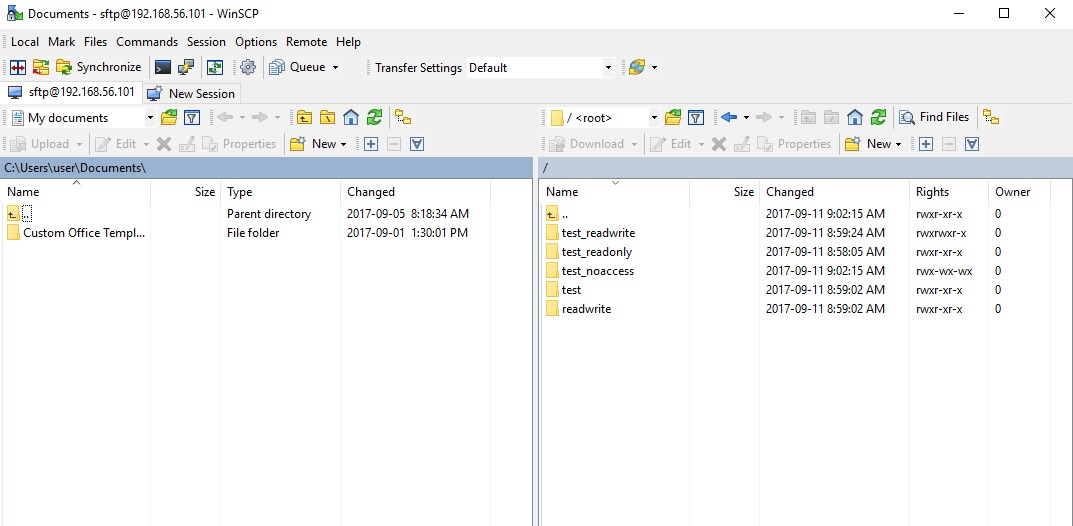
root@hrt-VirtualBox:/var/www# mkdir test_readonly
root@hrt-VirtualBox:/var/www# chmod 755 test_readonly
root@hrt-VirtualBox:/var/www# mkdir test readwrite
root@hrt-VirtualBox:/var/www# mkdir test_readwrite
root@hrt-VirtualBox:/var/www# chown root:sftponly test_readwrite
root@hrt-VirtualBox:/var/www# chmod 775 test_readwrite
root@hrt-VirtualBox:/var/www# mkdir test_noaccess
root@hrt-VirtualBox:/var/www# chmod 733 test_noaccess


you can use SCP or Putty to connect to server in windows

Hamidreza Talebi

Hamidreza Talebi, linux

You can set schedule in linux with this command:

$ crontab -e

for example:

We want our job to run at 5 A.M., which would be minute 0, hour 5, every day of the month, every month, every day of the week. We need to add a line to the bottom of the file which looks like this:

0 5 * * * /home/myname/scripts/do-every-day.sh

for backup everyday at 12:02 AM

2 0 * * * tar -zcf  /home/hrt/Desktop/backup/$(date +\%H-\%M-\%S-\%d-\%m-\%Y).tar.gz  /usr/local/bro/logs>/dev/null 2>&1

for fixing bug in ubuntu you have to add >/dev/null 2>&1 to every crontab you define.

For checking your crontab, use this command:

$crontab -l

For removing crontab just add this one:

$crontab -r

For viewing logs run  this command:

sudo grep -i cron /var/log/syslog

Overview

Still wondering which file transfer protocol is right for your business? Here’s a dozen you can choose from. We’ve also added some brief descriptions to make your choice easier.

Hamidreza Talebi

1. FTP (File Transfer Protocol)

When it comes to business file transfers, FTP is probably the first that comes to mind. FTP is built for both single file and bulk file transfers. It’s been around for quite some time, so you likely won’t have problems with interoperability. Meaning, there’ll always be a good chance your trading partner will be able to exchange information through it. You won’t have trouble finding a client application for your end users either.

The downside is, this file transfer protocol is not so strong on security. Hence, if you need to comply with data security/privacy laws and regulations like HIPAA, PCI-DSS, SOX, GLBA, and EU Data Protection Directive, stay away from it. Choose FTP if your business is NOT or does NOT:

  • Operate in a highly regulated industry like healthcare, finance, or manufacturing;
  • Send/receive sensitive files; or
  • Publicly traded (hence governed by SOX).

Another problem with FTP is its susceptibility to firewall issues, which can adversely affect client connectivity. Read Active v.s. Passive FTP Simplified to understand the problem and learn how to resolve it.

2. HTTP (Hypertext Transfer Protocol)

Like FTP, HTTP is a widely used protocol. It’s easy to implement, especially for person-to-server and person-to-person file transfers (read Exploring Use Cases for Managed File Transfer for reference). Users only need a Web browser like Chrome, Firefox, Internet Explorer, or Safari, and they’ll be ready to go. No installation needed on the client side.

HTTP is also less prone to firewall issues (unlike FTP). However, like FTP, HTTP by itself is inherently insecure and incapable of meeting regulatory compliance or securing data. Use HTTP if (lack of) security is not an issue for you.

Recommended post: How to Set Up a Web File Transfer

3. FTPS (FTP over SSL)

The good news is that both FTP and HTTP now have secure versions. FTP has FTPS, while HTTP has HTTPS. Both are protected through SSL. If you use FTPS, you retain the benefits of FTP but gain the security features that come with SSL, including data-in-motion encryption as well as server and client authentication. Because FTPS is based on FTP, you’ll still be subjected to the same firewall issues that come with FTP.

Organizations in the Legal, Government, and Financial Services industry might want to consider FTPS as an option.

Recommended post: Securing Trading Partner File Transfers w/ Auto PGP Encryption & FTPS

4. HTTPS (HTTP over SSL)

As mentioned earlier, HTTPS is the secure version of HTTP. If you don’t like having to install client applications for your end users and most of your end users are non-technical folks, this might be the perfect choice. It’s secure and very user-friendly compared to FTP/S.

Recommended post: How To Set Up A HTTPS File Transfer

5. SFTP (SSH File Transfer Protocol)

Here’s another widely used file transfer protocol that’s perfect for businesses who require privacy/security capabilities. SFTP runs on SSH, a secure protocol that – like SSL – supports data-in-motion encryption and client/server authentication. The main advantage of SFTP over FTPS (which is usually compared to it) is that it’s more firewall-friendly.

Recommended post: Business Benefits Of An SFTP Server

6. SCP (Secure Copy)

This is an older, more primitive version of SFTP. It also runs on SSH, so it comes with the same security features. However, if you’re using a recent version of SSH, you’ll already have access to both SCP and SFTP. Since SFTP has more functionality, I would recommend it over SCP. The only instance you’ll probably need SCP is if you’ll be exchanging files with a company who only has a legacy SSH server.

Recommended post:  Various Linux SCP Examples To Get You Started With Using Secure Copy

7. WebDAV (Web Distributed Authoring and Versioning)

Most of the file transfer protocols we’ve discussed so far are primarily used for file transfers. Here’s one that can do more than just facilitate file transfers. WebDAV, which actually runs over HTTP, is mainly designed for collaboration activities. Through WebDAV, users won’t just be able to exchange files. They’ll also be able to collaborate over a single file even if they’re (the users) working from different locations. WebDAV is probably best suited for organizations who need distributed authoring capabilities, e.g. universities and research institutions.

8. WebDAVS

By now, you should be able to guess what the S stands for. That’s right WebDAVS is a secure version of WebDAV. If WebDAV runs over HTTP, WebDAVS runs over HTTPS. That means, it exhibits the same characteristics of WebDAV, plus the secure features of SSL.

9. TFTP (Trivial File Transfer Protocol)

This file transfer protocol is different from the rest in that you won’t be using it for exchanging documents, images, or spreadsheets. In fact, you nornally won’t be using this for exchanging files with machines outside of your network. TFTP is better suited for network management tasks like network booting, backing up configuration files, and installing operating systems over a network. Why did we include it here? Well, it is a file transfer protocol and you certainly can use it in your business (albeit internally).

If you want to learn more about TFTP, the article What Is TFTP? would be a good place to start.

10. AS2 (Applicability Statement 2)

Although nearly all of the protocols discussed earlier are capable of supporting B2B exchanges, there are a few protocols that are really designed specifically for such tasks. One of them is AS2.

AS2 is built for EDI (Electronic Data Interchange) transactions, the automated information exchanges normally seen in the manufacturing and retail industries. EDI is now also used in healthcare, as a result of the HIPAA legislation (read Securing HIPAA EDI Transactions with AS2). If you operate in these industries or need to carry out EDI transactions, AS2 is an excellent choice.

Recommended post: You Know It’s Time To Implement Server To Server File Transfer When..

11. OFTP (Odette File Transfer Protocol)

Another file transfer protocol specifically designed for EDI is OFTP. OFTP is quite common in Europe, so if you transact with companies there, you might need this. Both OFTP and AS2 are inherently secure and even support electronic delivery receipts (read What Is An AS2 MDN?), making them perfect for B2B transactions.

12. AFTP (Accelerated File Transfer Protocol)

WAN file transfers, especially those carried out over great distances, are easily affected by poor network conditions like latency and packet loss, which result in considerably degraded throughputs. AFTP is a TCP-UDP hybrid that makes file transfers virtually immune to these network conditions. If you want to see the big difference AFTP makes, read the post Accelerated File Transfer In Action.

For a detailed explanation on the effects of latency and packet loss and how AFTP makes them virtually negligible, download the white paper How to Boost File Transfer Speeds 100x Without Increasing Your Bandwidth.

Companies in the Film and Manufacturing industries would find this protocol very useful.
 

Much of Bro’s capabilities originate in academic research projects, with results often published at top-tier conferences. Bro supports a wide range of analyses through its scripting language. Yet even without further customization it comes with a powerful set of features.

  • Feature

    • Runs on commodity hardware on standard UNIX-style systems (including Linux, FreeBSD, and MacOS).
    • Fully passive traffic analysis off a network tap or monitoring port.
    • Standard libpcap interface for capturing packets.
    • Real-time and offline analysis.
    • Cluster-support for large-scale deployments.
    • Unified management framework for operating both standalone and cluster setups.
    • Open-source under a BSD license.
    • Support for many application-layer protocols (including DNS, FTP, HTTP, IRC, SMTP, SSH, SSL).
    • Default output to well-structured ASCII logs.
    • Real-time integration of external input into analyses. Live database input in preparation.
    • External C library for exchanging Bro events with external programs. Comes with Perl, Python, and Ruby bindings.

    To install on Debian:

    1- sudo apt-get install cmake make gcc g++ flex bison libpcap-dev libssl-dev python-dev swig zlib1g-dev

    2- download from https://www.bro.org/download/index.html and extract it in VM machine.OR git clone –recursive git://git.bro.org/bro

    3- just like picture configure it
    ./configure

    4- Then type : make
    5- Then type : sudo make install
    6- Copy path to Bro install folder :
    nano ~/.bashrc
    add this line in the end of file
    export PATH=/usr/local/bro/bin:$PATH

    7-Config your node interface .
    sudo nano /usr/local/bro/etc/node.cfg

    
    [bro]
    type=standalone
    host=localhost
    interface=eth0

    *Note: You can define two or more network here. The name [bro] can be change for yourself as an option.

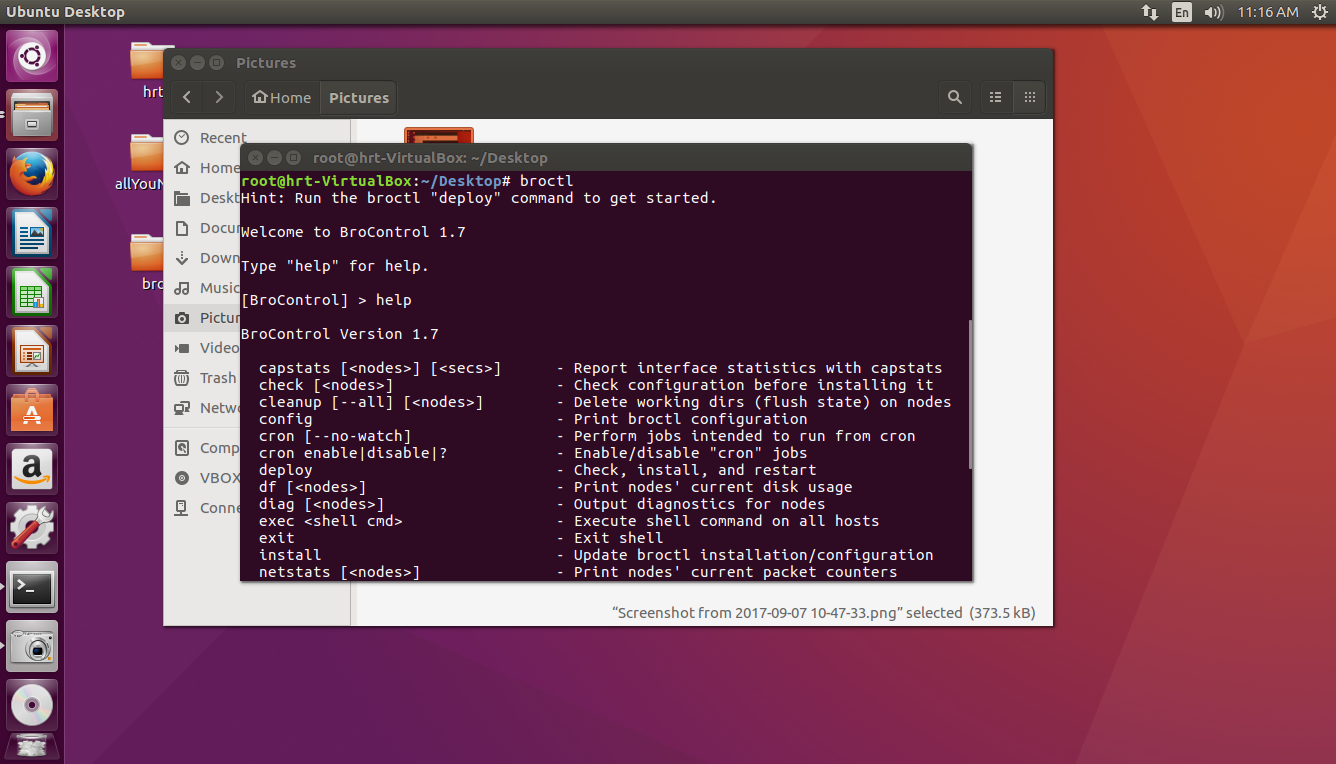
    8-Now change the directory and go to Desktop and make your user super user with sudo -s . Then type broctl
    9- in [BrotControl] start for starting bro | stop for stopping bro | nodes show number of nodes | status shows the name of node and bro
    Hamidreza Talebi

    * for Starting service always in [BroControl] first install then type start

  • if you get an error, you should define your network adapter in this file:
    nano /usr/local/bro/etc/networks.cfg
  • These are other files for your configuration:
    nano /usr/local/bro/etc/networks.cfg
    nano /usr/local/bro/etc/node.cfg

Go to this link for more information:
https://www.bro.org/sphinx/components/broctl/README.html

Log files by default is located in this path:

/usr/local/bro/logs/

with zcat command you can read logs but there are also some techniques you can boost your report. follow this link:

useful links for installing on server:

https://www.digitalocean.com/community/tutorials/how-to-install-bro-on-ubuntu-16-04

Hamidreza Talebi, linux

tty= teletypewriter

Ctrl+Alt + F1 =tty1
Ctrl+Alt + F2 =tty2
.
.

Ctrl+Alt+F7= graphic

Description of Command
$apropos file

See manual
$ man file

where we are?
$ which ls

what is in root
$ ls /

show files in list
$ls -l

show the content of directory
$ls -lR

. current directory
.. parent directory
~ user’s home folder

Editors
nano , vim ,vi
$ nano FileName
$ vi FileName
exit : escape :q

To create file
$ touch filename

To see inside file
$ cat filename

To copy
$ cp sourceDirectory Destination
$ cp myfile2 myfile3 Documents // copy to two destinations

To remove file
$ rm myfile

Give list of the files starts with a
$ ls a*


give list of the files starts with three character
$ls ???

link files together
ln users.txt Document/list.txt

find a file larger than 10M
$ find +size +10M

write some text in file
$echo “more information” > output.txt
$ ls > homedir.txt

Use Pipe
$ cat homedir.txt | wc
// count file text

compare files
$diff -y text1.txt text2.txt

$ diff -u text1.txt text2.txt

compare binaries files
$ cmp text1.txt text2.txt

Archives and Compression
$tar -cf doc.tar listoffiles
$tar -tf doc.tar //read
$tar -xf doc.tar extractdistination


Zip file1 file2 …
unzip myfiles.zip -d unzip //create foldername unzip to extract


Find with grep
$ cat users.txt | grep -E “[A-M][m-z]”

change permission
$ chmod 600 myfile
$ chmod ugo+rwx myfile

Hamidreza Talebi- Linux

change currnet user to root user
$sudo -s
#

SSH
$sudo apt install openssh-server

to connect from another system: ssh user@ip

SFTP
$ get file3
$ put file3

SCP
Secure Copy Protocol
remote component user@host:path-to-file
$scp file4 hrt@192.168.3.10:/Documents

Packages update
sudo apt-get update
sudo apt-get upgrade

Enable Firewall
ufw enable
ufw allow 22/tcp

Disable Firewall
ufw disable

dd if=source of=destination // copy large – cloning
ps //show process
ps aux | grep “evol”
ifconfig
apt-get install ….

ip address add 192.168.99.37/24 dev eth0


Do you know anything about SCOM?

System Center Operations Manager has a lot of different features, but what is System Center Operations Manager and how does it work? Well, System Center Operations Manager is a component of the System Center suite, and in our case we’re using the 2016 version. It enables us to monitor services, devices, and operations for many computers and many different types of computing devices in a single console. We can gain quick insight into the state of our environment, and our IT services running across different systems and workloads by using numerous views that show the state, health, and performance information.

It also generates alerts and shows us performance configuration, and security issues. One of the main tools in Operations Manager is our management center computer, and on that particular computer or server, we have a management interface, and it does a lot of different things. One of the things it does is it checks for problems in a management group. In many Operations Manager setups you’re going to see many different management servers, and if there’s any kind of a problem in that management group, then we can find out using that management interface.

We can also start monitoring a computer. This is at the heart of Operations Manager, is monitoring, and we can start monitoring a computer after we push the agent out to our Windows computer, and there are also agentless devices that we can send out to as well. We can create or modify a resource pool. Resource pools are something that we’re going to demonstrate in upcoming videos. We can create a group and give certain rights to those groups, and we can edit those groups as well.

There are lots of predefined security definitions for groups, but we can customize those settings if we desire. We can create or customize a view. There’s lots of different types of views, and some may or may not apply to you, which is why you have the option to do so. There’s event views, there’s state views, performance views, task status views. All different types of views that you can add or delete from your view list.

You can also check the heartbeat status between your management server, other management servers, and your devices. You can also change how often your management server reaches out to other servers and devices to check the heartbeat to make sure the device is up and running. The heartbeat is done using TCP/IP, and a simple ping type request to make sure that the other devices are running and still communicating with our management server. One of the main functions is going to be the rules, monitors, and alerts.

These particular functions give us the main information that we’re looking for when we are monitoring a device. The rules are setup to basically tell us what our thresholds are before we’re going to trigger an alert, and the monitors actually show a graphical representation if those devices have reached those thresholds. We can also use Operations Manager to give users permissions so they can look and see how their device is performing.

In some cases, you may not want this to happen, but in other cases you may have users who require this information to make sure that their device is operating optimally for the job function that they are providing the company. We can also use the tool to investigate a gray agent. A gray agent is an agent that is no longer communicating between the device and the management server, and using the investigation part of the Operations Manager, we can take a look and see why it is no longer communicating.

It could be that the device is offline, or there is a TCP/IP problem, or there is some other issue with the device. Knowing how to utilize Operations Manager can help the IT administrator decide how to best utilize System Center Operations Manager in their network environment.

SCOM- Hamidreza Talebi

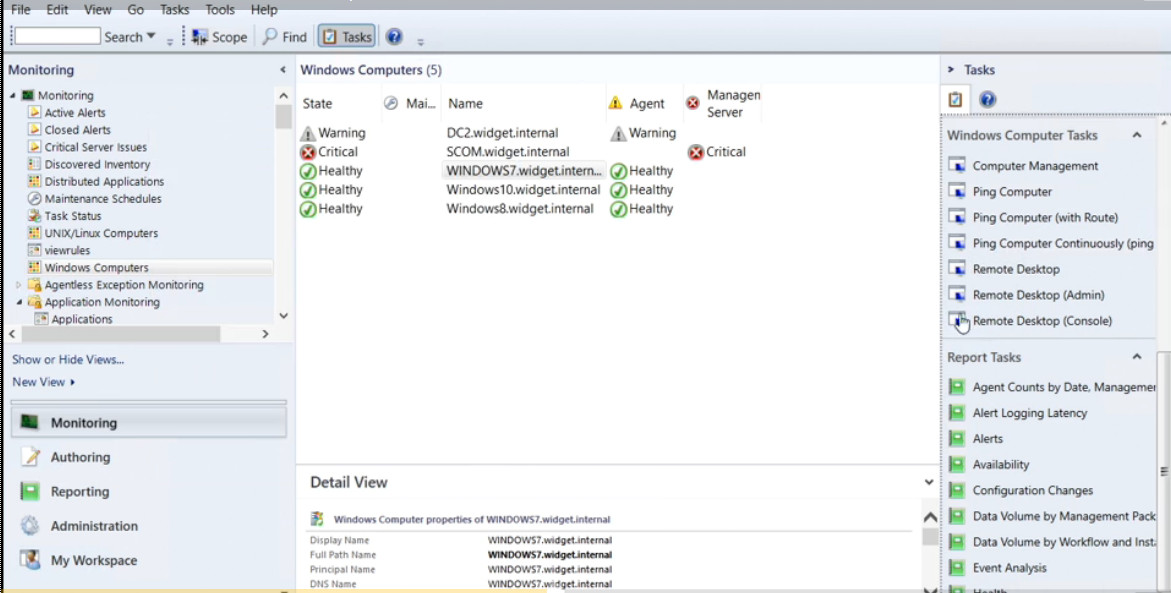
Feature of SCOM is:

  • Connection Health
  • Vlan health
  • HSRP group health
  • Port/interface
  • Processor
  • Memory

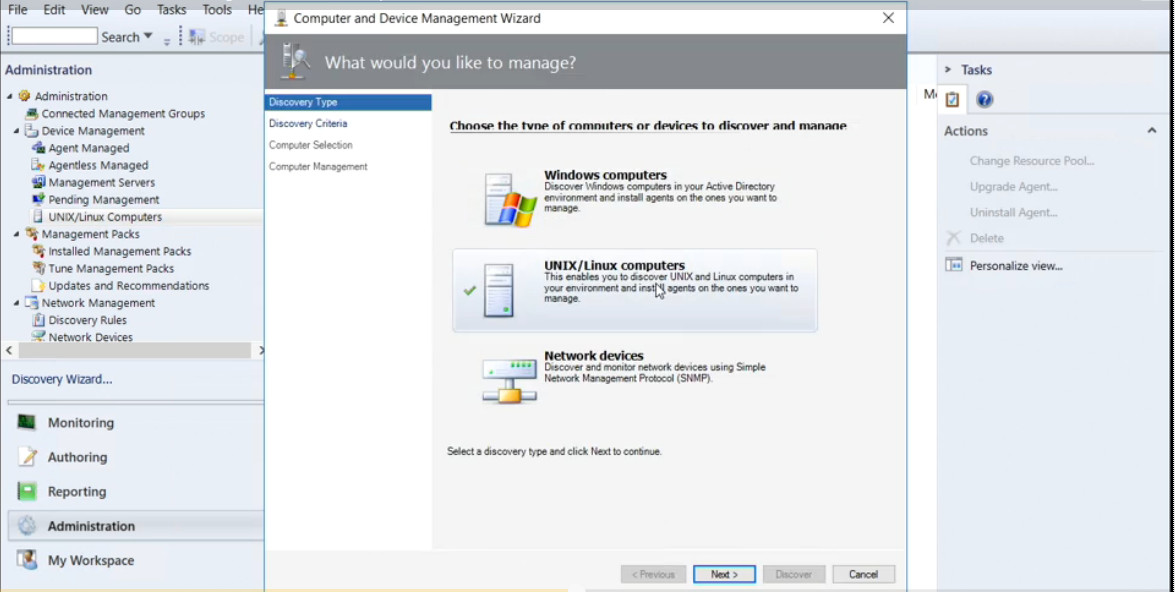
Some pictures of Environment:

Hamidreza Talebi- SCOM

Source: Lynda.com

Show Interfaces and Indexes
netsh interface ipv4 show interfaces

Set IPV4 Address

netsh interface ipv4 set address name=”3″(name of index) source=static address=10.3.66.4 mask=255.255.255.0 gateway=10.3.66.1

Set DNS Address

netsh ipv4 add dnsserver name=”3″ address=10.3.66.3 index=1

Set IPV6 Address

netsh interface ipv6 add address “3” fe80::12:aaa:b:6

Set DNS Address
netsh interface ipv6 add dnsserver “3” address=fe80::12:aaa:b:6 index=1

showing routing
netstat -rn

Changing Computer Name in PowerShell
rename-computer -newname yourcomputerName -restart

Joining Domain in PowerShell

netdom join yourcomputerName /domain:la.com /UserD:administrator /PasswordD:Password


Native file sharing protocols always win out
In an intranet, network clients have several options, such as AFP, NFS and SMB/CIFS, to connect to their file server. But for the best performance, and 100% compatibility, the native client file sharing protocol is the right choice. So AFP is the best protocol for all Mac clients through OS X 10.8, SMB is the standard for Windows clients, and NFS is perfect between UNIX servers. With the release of OS X 10.9 “Mavericks”, Apple fully supports both SMB2 and AFP.

In addition, remote users should be able to securely access server documents via web browser. And mobile users will appreciate a native app for server access and file sharing to their devices.

NFS(Network File Share)
NFS is good for UNIX server-to-server file sharing. However it is incompatible with Windows clients, and is useless for Mac file sharing clients due to missing features, and compatibility and performance problems with Mac apps.

SMB/CIFS (Server Message Block)
The native Windows network file sharing protocol is the preferred protocol for Windows clients.

AFP(Apple Filing Protocol)
AFP is clearly superior to SMB or NFS for Mac OS 8.1-OS X 10.8 clients

AFP is the native file and printer sharing protocol for Macs and it supports many unique Mac attributes that are not supported by other protocols. So for the best performance, and 100% compatibility, AFP should be used.


source: www.helios.de

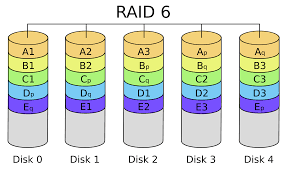
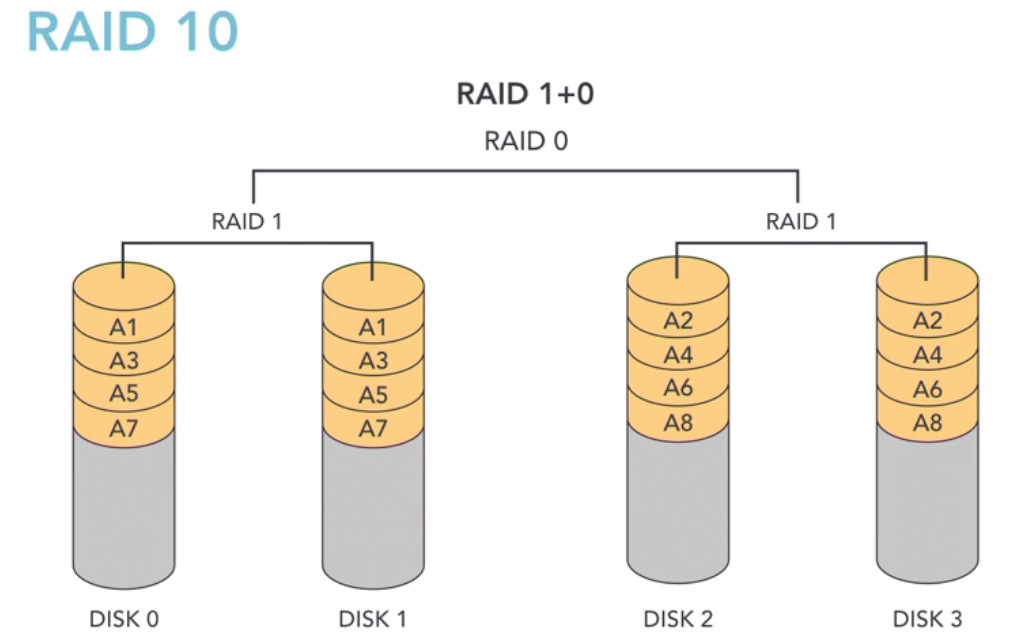
RAID is an acronym that stands for Redundant Array of Inexpensive or Redundant Array of Independent Disks. RAID is a term used in computing. With RAID, several hard disks are made into one logical disk.

RAID 0 (Strip)

  • Not Fault Tolerant
  • Performance benefit

RAID 1 (mirror)

  • Fault-Tolerant
  • Performance benefit

RAID 5

  • Fault-Tolerant
  • At least 3 disks
  • performance benefit

RAID 6


RAID 10

A partition structure defines how information is structured on the partition, where partitions begin and end, and also the code that is used during startup if a partition is bootable. If you’ve ever partitioned and formatted a disk—or set up a Mac to dual boot Windows—you’ve likely run into the two main partitioning structures: Master Boot Record (MBR) and GUID Partition Table (GPT). GPT is a newer standard and is gradually replacing MBR. GPT brings with it many advantages, but MBR is still the most compatible and is still necessary in some cases. This isn’t a Windows-only standard, by the way—Mac OS X, Linux, and other operating systems can also use GPT.

MBR was first introduced with IBM PC DOS 2.0 in 1983. It’s called Master Boot Record because the MBR is a special boot sector located at the beginning of a drive. This sector contains a boot loader for the installed operating system and information about the drive’s logical partitions. The boot loader is a small bit of code that generally loads the larger boot loader from another partition on a drive. If you have Windows installed, the initial bits of the Windows boot loader reside here—that’s why you may have to repair your MBR if it’s overwritten and Windows won’t start. If you have Linux installed, the GRUB boot loader will typically be located in the MBR.

MBR does have its limitations. For starters, MBR only works with disks up to 2 TB in size. MBR also only supports up to four primary partitions—if you want more, you have to make one of your primary partitions an “extended partition” and create logical partitions inside it. This is a silly little hack and shouldn’t be necessary.

GPT is a newer standard that’s gradually replacing MBR. It’s associated with UEFI, which replaces the clunky old BIOS with something more modern. GPT, in turn, replaces the clunky old MBR partitioning system with something more modern. It’s called GUID Partition Table because every partition on your drive has a “globally unique identifier,” or GUID—a random string so long that every GPT partition on earth likely has its own unique identifier.

GPT doesn’t suffer from MBR’s limits. GPT-based drives can be much larger, with size limits dependent on the operating system and its file systems. GPT also allows for a nearly unlimited number of partitions. Again, the limit here will be your operating system—Windows allows up to 128 partitions on a GPT drive, and you don’t have to create an extended partition to make them work.

totally:

Master Boot Record (MBR) –> 2TB (older os) (32bit)          physical —> Virtual
GUID Partition Table (GPT) –> 16exaByte (64bit) (Repair)         physical -(need tools)–> Virtual


source: howtogeek.com

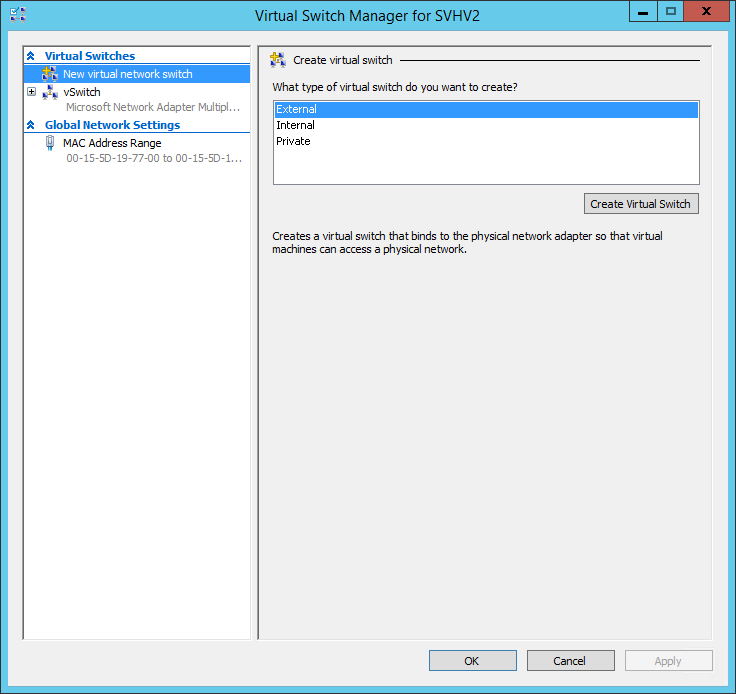
I have seen some folks who are confused about the concept behind the virtual machine switches. so, I have decided to explain this concept in a simple way:

External : Communicate outside of host (Internet)
Internal: Virtual machine can talk each other and physical host (not Internet)
Private: Just virtual machines can talk each other not physical host