Today we will be looking into how to setup a centralized log management for Linux servers, this will help the Linux admin to have a multiple server logs into one single place. The Linux admin not required to login in to each servers for checking the logs, he can just login into the centralized server and start do the logs monitoring.
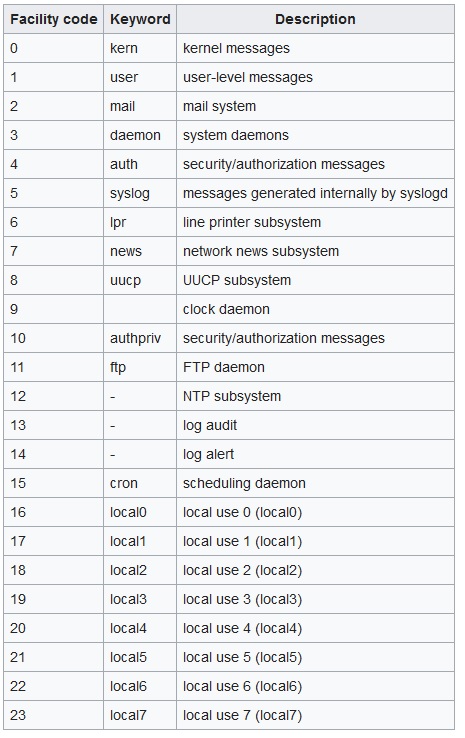
Linux labels (auth, cron, ftp, lpr, authpriv, news, mail, syslog, etc ,..) the log messages to indicate the type of software that generated the messages with severity (Alert, critical, Warning, Notice, info, etc ,..).
You can find more information on Message Labels and Severity Levels
Make sure you have the following to setup log server.
Two Linux servers ( server and client).
server.itzgeek.com 192.168.12.131
client.itzgeek.com 192.168.12.132
Server setup:
Install syslog package, if you do not have it installed.
[root@server ~]# yum -y install rsyslog
|
Edit /etc/rsyslog.conf
[root@server ~]# vi /etc/rsyslog.conf
|
Un comment the following to enable the syslog server to listen on the tcp and udp port.
From
# Provides UDP syslog reception
#$ModLoad imudp
#$UDPServerRun 514

# Provides TCP syslog reception
#$ModLoad imtcp
#$InputTCPServerRun 514
|
To
# Provides UDP syslog reception
$ModLoad imudp
$UDPServerRun 514

# Provides TCP syslog reception
$ModLoad imtcp
$InputTCPServerRun 514
|
Restart the syslog service
[root@server ~]# systemctl restart rsyslog.service
|
Verify the syslog server listening.
[root@server ~]# netstat -antup | grep 514
tcp        0      0 0.0.0.0:514             0.0.0.0:*               LISTEN      759/rsyslogd
tcp6       0      0 :::514                  :::*                    LISTEN      759/rsyslogd
udp        0      0 0.0.0.0:514             0.0.0.0:*                           759/rsyslogd
udp6       0      0 :::514                  :::*                                759/rsyslogd
|
Client setup:
Install syslog package, if you do not have it installed. Edit /etc/rsyslog.conf
[root@client ~]# vi /etc/rsyslog.conf
|
At the end of file place the following line to point the client message log to the server
*.info;mail.none;authpriv.none;cron.none @192.168.12.131
|
You can either mention @hostname or @ip address.
Restart the syslog service
[root@client ~]# systemctl restart rsyslog.service
|
Now all the message logs are sent to the central server and also it keeps the copy locally.
Firewall Port opening (Optional):
Mostly all the production environment are protected by hardware firewall, ask them to open the TCP & UDP 514.
If you have IP tables enabled, run the following command on server in order to accept incoming traffic on UDP / TCP port 514.
[root@server ~]#firewall-cmd --permanent --zone=public --add-port=514/tcp
[root@server ~]#firewall-cmd --permanent --zone=public --add-port=514/udp
[root@server ~]#firewall-cmd --reload
|
You can verify the port opening by issuing the following command from the client.
[root@client ~]# telnet 192.168.12.131 514

Trying 192.168.12.131...
Connected to 192.168.12.131.
Escape character is '^]'.
|
If it didn’t give any reply, disable firewall on both client and server.
Test:
Monitor the activity from the log server, open the message log.
[root@server ~]# tailf /var/log/messages
|
I have installed and started vsftpd on client machine, you can see both are recorded in syslog server.
Oct  5 06:03:53 client yum[2425]: Installed: vsftpd-3.0.2-9.el7.x86_64
Oct  5 06:04:13 client systemd: Starting Vsftpd ftp daemon...
Oct  5 06:04:13 client systemd: Started Vsftpd ftp daemon.
|
By this way you can monitor the other logs such as secure, mail, cron logs etc.
also we have these main categories for syslog’s facility:
source: http://www.itzgeek.com/how-tos/linux/centos-how-tos/setup-syslog-server-on-centos-7-rhel-7.html